Showing posts with label Power Platform. Show all posts

Wednesday, 9 June 2021

Using RPA to control my ISP settings for kids gaming - Power Automate Desktop for web automation - part 1

Like many families, we have annoying kids who would spend all their time gaming or on screens given half the chance. So, our tyrannical regime approach essentially grants them a certain amount of time per week, with controls put in place through our ISP which allows me to block or allow individual websites. Unfortunately with my ISP (Virgin Media here in the UK) there's no scheduling capability for this, only for parental controls overall - which means I have to manually go the portal and tap in the sinful URLs many times per week, and then unblock later on. A recurring conversation in our house goes something like this:  

  • Kid - "Dad, you know how you block our gaming websites when it's not gaming time so we can't sneak on?"
  • Me - "Yes?"
  • Kid - "Well, you're always on calls when it's 5pm on a gaming day and we're losing lots of time. It's so unfair! Can't you schedule it or something?"
  • Me - "Sorry son. Despite using a company who claim to be the UK's leading ISP and paying them through the nose each month, they chronically underinvest in their management portal and it was built by interns in the 1990s. There are no APIs either, so it's not possible unfortunately. Trust me, I'd like nothing more than to never visit that thing again or have notes shoved under the bedroom door when I'm on calls - but that's life son."
  • Kid - "Erm. Could we not just......turn the controls off?"   
  • Me - "Hahahahaha!"

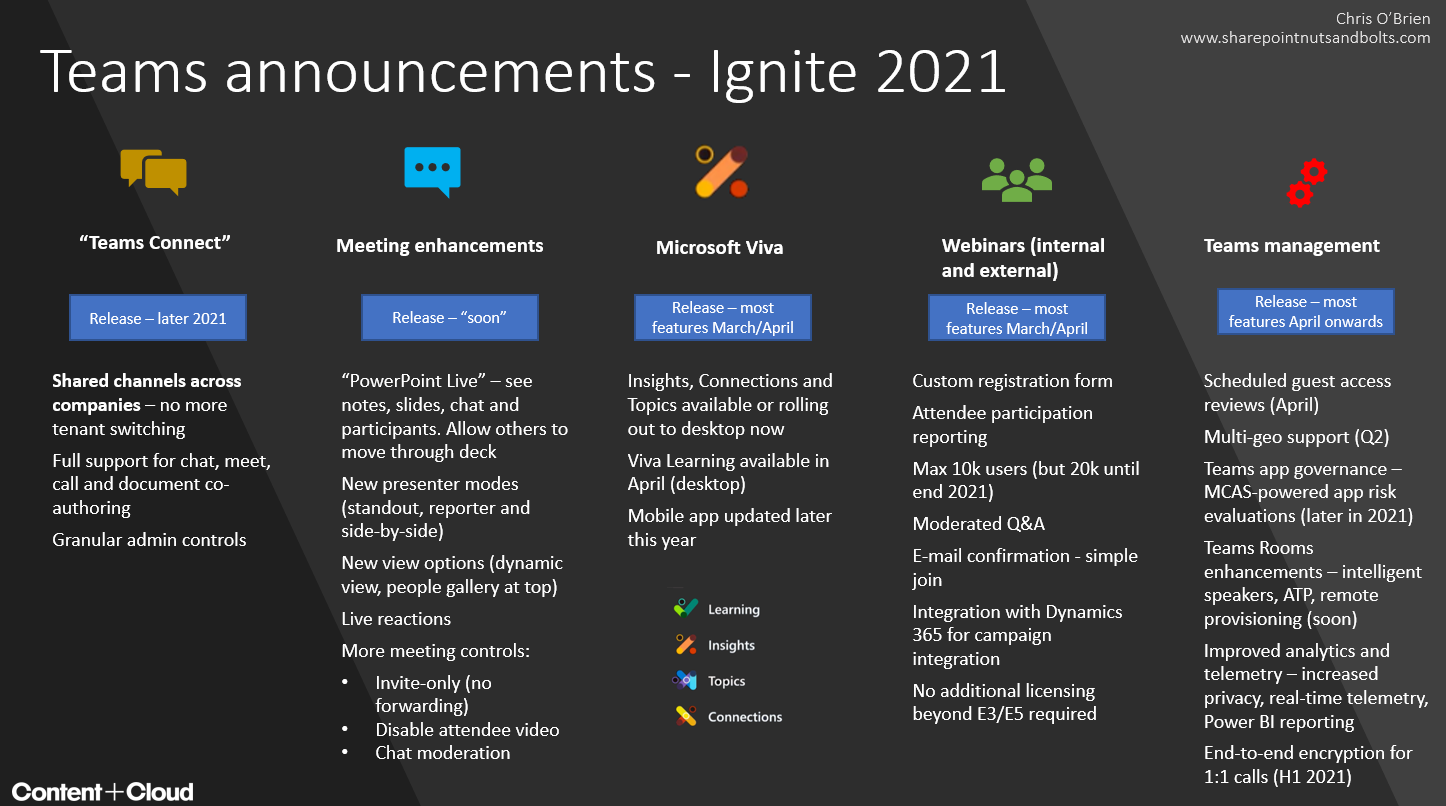
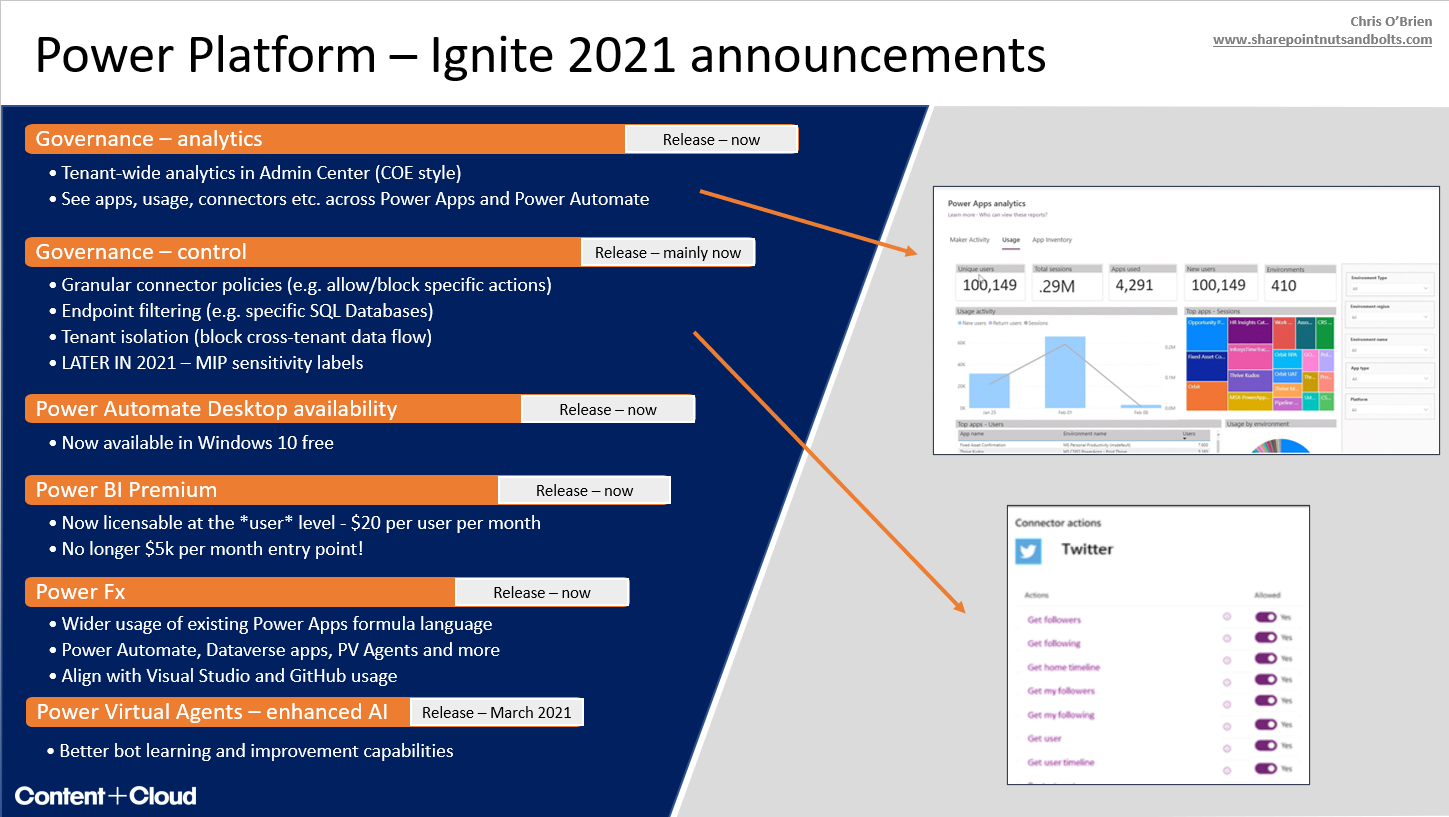
After the 86th iteration of this conversation, I decided to spend a weekend looking at Power Automate Desktop for this since it does web automation. Microsoft announced in March 2021 that Power Automate Desktop is now free with Windows 10 as they expand the Power Platform into other forms of automation. In truth, the licensing means that if you want true unattended execution (rather than attended automation where you manually press a button and all the steps execute for you), Microsoft's RPA technology is more suited to workplace scenarios than home or personal automation. I'll talk more about licensing in the next article. Nevertheless, my ISP scenario was a good excuse to automate something else and try another scenario with Power Automate. 

What I'm automating

The basic process can be described as:

Once logged into the Virgin Media portal I can manage my "web safe" settings through a series of tabs. I'd need the automation to load the website (ensuring the session is authenticated with my credentials), and firstly navigate to the "Websites" tab shown below:

The websites tab provides an interface to specify the sites to block. I leave some sites permanently blocked, but what my automation needs to do is come in here and add or remove the "scheduled" websites. As the numbers in the image below depict, it's a 3-step process involving the URL being typed into the box, the "Add" button click and then settings applied with the "Apply" button once all changes are in:

The unblocking is effectively a reversal - this time the automation needs to find the right entries in the list and click the "Remove" link next to each. This involves a slightly different series of steps and there are a couple of ways in Power Automate Desktop to do this, but we'll get to that later. 

Getting started with Power Automate Desktop

Given that the tool is all about automation from the desktop (although cloud-integrated), we need to download some software. There are a number of ways you can do this, including from the "Install" menu within the Power Automate portal:


Once installed and signed-in, your machine effectively has a binding to a Power Platform environment:

Power Automate Desktop capabilities

The overall capability set is very powerful indeed, and of course the whole premise of desktop automation is that you can record (or manually create) steps which drive keyboard and mouse actions. You can open applications and browser windows, interact with their controls, and perform steps in systems that would be otherwise difficult to automate. Here are some of the things you can do:

Control elements of the desktop PC:      Work with files and folders:

Control applications through UI automation:     Control applications through web automation:

This distinction between "web automation" and "UI automation" is important - we'll come back to this later, but notice there are some similarities and some differences between the possible actions.

Overall, the toolbox covers many different areas of automation and there are almost infinite permutations of how these things can be combined:

Now let's look at the specific process to implement the automation I need.

Getting started with Power Automate Desktop

Like other desktop automation software, Power Automate Desktop brings a recorder to allow you to record the screen as a one-time operation to create your automated process. Whilst you *can* create your automation by directly dragging and dropping actions from the toolbox, in most cases you'll use the recorder somewhere in there. In fact, there are two:

  • A web recorder
  • A UI recorder
These are represented as two icons at the top of the designer:

As we're talking about this distinction, here's a tip:

Tip #1 - Web automation vs. UI automation
Since it's web automation I need to perform, using the web recorder is likely to give me the best results since it has a deeper understanding of browsers, web page structure and HTML input elements such as textboxes, radio buttons and dropdowns. The UI recorder is more suited to automation of desktop apps. This rule of thumb works in most cases, though I could imagine the occasional need to use UI automation in the browser (e.g. for a particularly complex web UI where pixel locations are more effective than navigating a DOM structure or dealing with content represented in images).

When using the web recorder you choose which browser to use - regardless, you'll always need the Power Automate Desktop browser extension installed and enabled (here are the links for Edge and Chrome). You select your browser of choice to get started:

Tip #2 - Chrome vs. Edge
At the moment, web automation with Chrome seems to be much more reliable than with Edge. The notorious "failed to get window" error seems much more common with Edge, and operations that fail in Edge tend to just work in Chrome. For now, I recommend switching to Chrome if you're trying with Edge but run into unexplained challenges.

As you record the steps you want to automate, they are captured by the Web Recorder:

In the end, my automated process looks for blocking the websites looks like this:

Tip #3 - use variables in your automated steps
Whilst the recorder will do a good job of detecting text you type into forms, replacing these with variables to more clearly separate out the values is a good idea. They become easier to replace and less buried in your script - just like in code.

In my case I have variables for the two websites I want to block and my Alexa access code:

The result

The video below shows the automated process in action - some observations:
  • It happens very fast :) 
  • It's hard to see what happens because some UI elements are off-screen or barely in the screen - however the web automation doesn't care about this 


Reversing the process - unblocking the sinful websites


As you might expect, I have a similar process to reverse the actions - in essence I have two distinct Flows (which can be scheduled independently):

In my case, unblocking is a little more challenging because I have to identify the correct sites in the list. This proved to be one of those web automation challenges where it takes more than the recorder to nail the steps. I found myself with two options:
  • Identify the right CSS selector to find the element with "roblox.com", and navigate in the DOM to a sibling element which is the "Remove" hyperlink
  • Leverage the fact that the websites I'm removing will always be the last ones in the list. This was far simpler!
In the end I used Power Automate Desktop's ability to run some JavaScript on the page you're automating - very powerful! My actions looked like this:

The final step - announcing to Alexa

Since the whole problem scenario is the fact that I'm often on calls, I needed to signal to the kids that gaming was either available or unavailable. Alexa automation is a world I hadn't really dug into until now, but I found there are essentially two ways of getting what I wanted -
  • Alexa Notifications - this pings the Alexa devices, but only in a "you have a notification" way. To listen to the notification, someone has to say "Alexa, read me my messages", which is sub-optimal for what I wanted
  • Alexa Routines - this allows you to do any number of things, including make an announcement in the true sense with no "pull" of the message required
To integrate with Alexa Routines, I used the Virtual Buttons Alexa skill - this is a service which abstracts the triggering of Alex Routines and gives you a REST endpoint to call. If you want more than one virtual button, and I did because I wanted two different announcements, the service is chargeable but the cost is fairly negligible and it does seem to simplify things.

There's some setup work to do, but the steps are documented in an e-mail the service creators send. Part of the process involves defining the Routine in the Alexa app - in this case, to announce "Sorry kids, gaming is blocked" or similar:   

To integrate this into my automated process, I made use of the "Run PowerShell script" action in Power Automate Desktop and called the REST API through Invoke-RestMethod, passing the appropriate JSON in the body to call make the blocked/unblocked announcement as needed (via the Virtual Button ID):

Summary

Solution complete! I now have an automated process which opens a browser, drives the keyboard and mouse to make the changes to my ISP settings, and announce to Alexa when done - fantastic.

Except at this point, things aren't fully automated in an unattended sense - up to now, I have a button to click in Power Automate Desktop which will fire up the browser and execute the steps. I have to press the button manually though. The next step is to make this an automated process that runs from the cloud on a schedule. So next time, we'll talk about:

  • Turning this into a cloud Flow which runs on a schedule
  • Licensing considerations for Power Automate Desktop
  • Authentication challenges and solutions
For the last point, I'm talking about things like this - Captcha image verifications which are designed to foil malicious automation:


More on this next time!

Thursday, 13 May 2021

Speaking at ESPC21 - using Power Apps and AI for Incident Reporting

The European SharePoint, Office 365 and Azure Conference has always been one of my favorite events in Microsoft technology, and I'm looking forward to delivering a session at the event again this year. The event is running on June 1-2, and the good news of course is that you can attend with no travel required. I can guarantee you will have no problems with travel AC adapters! ESPC always has amazing content, and as usual there are keynotes and announcements from Microsoft execs such as Jeff Teper, Karuana Gatimu, Charles Lamanna, Adam Harmetz and others. 

I really like what the conference has done with pricing when in "virtual mode" - there's a free registration option, but also pay-for choices which get you many extras including on-demand session access, certain bonus sessions and a choice of pre-event tutorials. There's a link to pricing and the conference schedule at the end. 

Some details on my session:

Building an Incident Reporting Solution with Power Apps and AI

AI is no longer a high-end concept that only applies to organisations with large I.T. budgets. Instead, it is readily available in numerous ways in Microsoft cloud technologies, and when your content is already in Microsoft 365 it's easy to tap into. The scenario used here is incident reporting, but the approaches shown in this session can apply to *many* common applications.

Using a combination of Power Platform and Azure Cognitive Services, we'll show how to add image recognition and tagging to an app in a few easy steps. This session is aimed at developers, citizen developers, and anyone else building solutions in Microsoft 365.

Session link: Building an Incident Reporting Solution with Power Apps and AI

I will be taking any questions you may have live during my session, so come prepared! 

As a speaker at ESPC21 Online I can share with you a special 25% discount on Pro Access tickets, which includes a pre-event tutorial of your choice, all event sessions on demand and more. If interested, just use code ESPCPRO when booking here

You can find the full event schedule here and check out some of ESPC’s reasons why you don’t want to miss this event here. I hope to see you at ESPC21 Online!

Thursday, 1 April 2021

Ignite 2021 announcements summary - Teams, Power Platform, Azure, Security and Compliance

Microsoft announced a lot of changes and enhancements to their cloud products last month at Ignite, their major conference. Keeping up with the firehose of constant change is difficult at the best of times, but the flurry of announcements at these events - not to mention minor updates masquerading as major announcements - only makes it more difficult. You'd be forgiven for missing some key developments frankly. Whilst the "Ignite Book of News" that Microsoft create is useful (link at the end), I find myself needing a more concise summary - something I can reference when talking to my team or with clients. All of which leads me to my "Ignite on a slide" summaries that I'm sharing here.

In this post you'll find slides as images, and a downloadable deck which combines all of them - I cover the following technologies:

  • Teams
  • Power Platform
  • Azure
  • Microsoft Security & Compliance

Feel free to re-use or share.

Microsoft Teams


(Click to enlarge)

Microsoft Power Platform


(Click to enlarge)

Azure


(Click to enlarge)


Security & Compliance


(Click to enlarge)

Of course, my summaries are somewhat subjective and you might feel there's something I've missed - but hopefully they're useful somehow.

Download the combined deck

Summary

Hopefully these summaries are useful in some form and you're free to use them as you like. When you need more detail on any of these announcements (and you will), I highly recommend using Microsoft's published "Book of News":

Link:  Ignite Book of News

Sunday, 31 January 2021

Slide deck and videos - Building AI into Power Platform solutions

This is a quick post to publish some resources I created recently covering considerations for using AI in the Power Platform. They are from a talk I gave at ESPC 2020 (the European SharePoint, Microsoft 365 and Azure Conference).

For many people getting into building Power Apps and Power Automate solutions, the obvious first choice is the "AI Builder" capability which comes as part of the platform, but as I've discussed elsewhere there are certainly options beyond that - each with different costs and capabilities. 

Topics covered include:

  • What you can expect to pay for AI
  • Different implementation approaches, specifically:
    • Power Apps AI Builder
    • Use of Azure Cognitive Services from code
    • Use of Azure Cognitive Services in a Flow (Power Automate)
  • A real world scenario - building an Incident Reporting Power App which uses AI to alert a human when a serious incident is detected
One area of focus is how Microsoft 365 technologies can easily be strung together to create high value solutions with minimal effort. The slide below depicts how Power Apps, SharePoint, Power Automate, Azure Cognitive Services and Teams each play their part in my demo scenario:


We can expand on how each technology is used as follows:

The slide deck hopefully has a few more useful slides too - it can be browsed or downloaded below.

Slide deck - Building AI into Power Platform solutions:


Demo videos


Demo 1In this video we take a part-built app and integrate with Power Automate to take the photo captured from the user's phone and store it in Microsoft 365/SharePoint:


Demo 2In this video we add AI to the application by integrating image recognition from Azure Cognitive Services. We do this using Power Automate in Microsoft 365, with no code required:


Monday, 16 November 2020

Automating location check-ins with Power Automate

Geofencing is the idea of a location service triggering an action whenever a device (i.e. a user's mobile device) moves in or out of an area, and there are lots of great use cases. On the personal/home automation side, you might want to automatically switch the house lights off and activate the alarm when you leave home (think IFTTT or Zapier if you're familiar with those), and on the work side your employer might provide an app which automatically checks you in (or out) of an office location dependent on your location - as just two examples. I was looking at the latter scenario for our internal desk booking app as part of our "controlled use of offices during Covid" plan. 

You can imagine lots of cases where knowing the user's location and whether it has changed can be powerful.

The Power Platform has a couple of ways to tap into this. I'd been researching the Location trigger in Power Automate, and this provides a Flow action named "When I enter or exit an area":

As is normal with geofencing, you specify a location anywhere in the world and create a radius around it. The location is approximate since GPS on the user's mobile device is used, but it works great for most purposes: 


Things were working great for a while, but then I ran into this:

The Location trigger has been removed from Power Automate!

The trigger was only ever in preview, and sadly in the few weeks since I had this article in draft (and had taken the above screenshots) it was removed. At this stage it's unclear whether it will return, and whilst there are traces of it on the internet there are no mentions of it within Microsoft documentation.

So that's a shame! To be quite honest, there was a challenge with the trigger anyway in the Power Platform - it could only ever be used for personal Flows, meaning each user who should use the capability would need to create their own Flow. Clearly this doesn't work for any kind of business solution provided by an organization, but could still be useful for personal automation.

How else can we automate based on user location?

The good news is that Power Automate is still able to understand the user's device location. A fully automated solution which is triggered simply by moving in or out of a defined region is no longer possible, but if you're happy to have users manually click a button on their device, similar automations are still possible. Indeed, in some scenarios this approach may be preferred so that there's a level of human control and opt-in - allowing the user to avoid triggering a process if the circumstances don't warrant it (e.g. leaving the area radius briefly to pick up lunch). 

So, let's take a look at how we can build Power Platform apps which account for the user's location.

Using Flow buttons to log a location visit

Flow buttons provide a great way to build a mobile app with a super-simple user interface - without having to delve into any kind of coding or the world of native iOS or Android development. In my example below, I'm using a simple button and a very simple form. But first, the prerequisites.

The first requirement for a solution like this is for users to have the Power Automate app installed on their mobile device. Your organization could push it out using a MDM or MAM solution, or it's available in both the Apple and Google app stores:

The user will need to sign-in to the app with her Microsoft 365 identity. The other important thing is that location services are enabled on the device for the Power Automate app - an obvious necessity if we are collecting and logging the location. 

Once in the app, the user would go to the "Buttons" area in app using he navigation bar along the bottom.

Any Flows which have been created using the "Manually trigger a Flow" trigger will appear in here: 


In my solution, I have a Flow to log details of a location visit - this is named "Report location status" in the image above, and you can also see some other Flows which also use the the button trigger. As you've probably gathered, these are known as "Flow buttons" and provide a really quick and easy way of manually triggering a process. No need to create and deploy a custom app - instead we can piggy back on what the Power Platform provides. 

When the button is clicked, some information can be selected to feed into the process. In my example of logging a location visit, the Flow asks for a "status" to be collected:


In the case of my solution, when the user submits this "location report" I store the details in a SharePoint list. Power Automate has done the hard work of automatically deriving the user's location at the time of pressing the button, and with a little column formatting magic I can display a small map for the location instead of just the address text:


So that's it! With fairly minimal effort in the Power Platform we have a mobile app which can collect the user's location, collect additional information and log it into a central store such as a SharePoint list in Microsoft 365.
 

How do we build that?

We've covered what the user would see, but what is needed in Power Automate to create this? We start by creating a Flow with the "Manually trigger a flow" trigger. Notice in my case I've added a single input named "Status", and supplied some help text:


You could actually stack several of these inputs and essentially create a mini-form which is presented to the user when they hit the button - which becomes quite powerful when you consider that no coding is required and we don't even need a Power App. 

The next step in the Flow is simply to log the item to SharePoint. I have a list ready to go with appropriate columns, and I just need to configure the Flow action to store the data in each:

 
The important thing is that several tokens are available from the trigger, including:
  • User name
  • User email
  • Timestamp
  • Date
  • fullAddress - this is the full address of the auto-derived location of your user
  • Many address sub-components:
    • Street
    • City
    • State
    • Postal code
    • Country
    • Latitude
    • Longitude
  • Any inputs you have added (e.g. "Status") in my case 
The final step in my Flow is to send a confirmation to the user that the report was logged successfully:


Which results in this appearing on the device:


So we've managed to capture the user's location and status report of the location, and confirmed back to them that the data was saved. 

Summary


The Power Platform has many amazing facilities for building applications, and that's especially the case for simple mobile applications. The ability to tap into device features such as location and the camera mean that you can build very capable apps quickly, without code - and certainly without all the hassles of native app development and distribution. In this post we looked at how Flow buttons can be used to quickly trigger a process from the mobile app, and how to capture the user's location at the time. 

Unfortunately the "When I enter or exit an area" Power Automate trigger that was in preview hasn't made it to release - but we hope it comes back because that would unlock some great scenarios around automation and the user's location. Come on Microsoft!

Wednesday, 22 April 2020

Infuse AI into your Office 365 apps – three approaches and pricing: Part 3

This is the 3rd article in my series on AI in Office 365 apps. Obviously the world has turned upside down since the last post a few weeks ago - firstly I hope you and the people you care about are well and you are coping. We're learning more about new world each day, and it's clear some things might not be quite the same again. I think it's fair to say we'll see greater use of the technologies discussed in this series - the Power Platform, Azure and AI. Many organizations now need to transform very rapidly - and that means new forms of I.T., new processes, and in many cases more automation. You've probably seen Power Apps such as the Crisis Communications app and Emergency Response app emerge from Microsoft, and the fact that these apps were produced so quickly highlights how effective these technologies can be. Being able to plug AI into such apps provides a strong foundation for a wide range of scenarios, as you've hopefully seen in the "Incident Reporting" sample app I built for this series.

As a reminder, the articles in this group are:

  1. AI in Office 365 apps - a scenario, some AI examples and a sample Power App 
  2. AI in Office 365 apps - choosing between Power Apps AI Builder, Azure Cognitive Services and Power Automate 
  3. AI in Office 365 apps - pricing and conclusions (this article)
As you might expect, pricing is another area where things get interesting as we compare the three approaches. We looked at capabilities last time (and some factors which can guide you to which form of AI is right for a given situation) - but pricing surely has to be part of the overall decision making process, so let's dive into that now.

In writing this article I compiled costs for the three approaches based on the following parameters for the Incident Reporting app used in the previous articles:
  • 200 users
  • Varying transactions (incidents being reported with an image to tag/describe) - 1000, 100,000, 200,000 and 1 million
  • Calculate app running cost per month

I ended up with a spreadsheet that looks like this - but the costs on their own don't mean much without commentary so I've blurred out the numbers for now, but we'll come back to this later. I'm just providing this here so you can understand the process I went through:

 
So let's dive into the different approaches, starting with Power Apps AI Builder.

Power Apps AI Builder - pricing

Use of AI Builder in Power Apps is enabled by purchasing "AI Builder service credits". Prices can be obtained on the Power Apps pricing page, and the idea is that these are purchased in blocks of 1 million service credits. Prices at the time of writing are $500/£377/€421 per block per month. So the immediate question of course is "how many service credits will I consume?". In the case of the scenario discussed in this series, the specific question would be "how many service credits will my use of Object Detection consume?", since that's the particular type of AI Builder functionality which is appropriate.

Microsoft provide the Power Apps AI Builder pricing calculator to help with this kind of cost forecasting. There, you can enter the number of transactions you'd like to price for - so I entered my range of numbers (1000, 100,000, 200,000 and 1 million) and assumed my model would be trained once per month:


This gives me an estimate of how many AI Builder add-on units are required for that many transactions, and the cost in USD:


So, we get a monthly cost of $500 for 1000 transactions - and we can use the calculator to see costs for varying usage levels The caveat is that they are only estimates rather than a guaranteed price, but they should be reasonably accurate.

However, the big thing to also consider for this approach is that we also need Power Apps per user/per app licensing to cover our 200 users. As the Power Platform licensing FAQ states, "AI Builder is licensed as an add-on to standalone Power Apps and Power Automate licensing as well as Dynamics 365 licenses." What that means of course, is that if you're using Power Apps through Office 365 licensing, you cannot use AI Builder - Power Apps licensing itself is required too. As we'll see, this makes a HUGE difference to the pricing - something that won't be a surprise to anyone who has previously looked at Power Platform licensing.

So, pricing for this approach ends up like this - these numbers are PER MONTH for our varying amounts of usage:


So, things feel expensive when using Power Apps AI Builder - but the costs are mainly coming from the core Power Apps licensing requirements for our 200 users, rather than the AI Builder costs.  

Azure Cognitive Services - pricing

So, does sidestepping Power Apps AI Builder and plugging directly into AI services help in any way? Well, as you might expect, the Computer Vision API in Azure (which again, is the particular AI service relevant to the needs of our scenario) is priced by number of API transactions i.e. it is a consumption-based Azure service. There are tiers of 0-1 million, 1-5M, 5M-10M, 10M-100M and so on, with pricing getting cheaper the more you use. Pricing will vary per region, and there's a different pricing rate for each capability.

For our scenario, we would use the following capabilities of the Computer Vision API:
  • Tag
  • Detect
  • Describe
Pricing looks like this:

ItemPricing (current, UK, lowest tiers)1000100k200k1m
Tag0-1M transactions — £0.746 per 1,000 transactions
1M-5M transactions — £0.597 per 1,000 transactions
£0.75£74.60£149.20£597.00
Detect0-1M transactions — £1.118 per 1,000 transactions
1M-5M transactions — £0.746 per 1,000 transactions
£1.12£111.80£223.60£746.00
Describe£1.864 per 1,000 transactions£1.86£186.40£372.80£1864.00
TOTAL£3.73£372.80£745.60£3207.00

So if our app had around 1000 incidents reported per month, we'd be looking at a total of £3.73 per month. 2000 incidents would be £7.46, and so on.
As you can see, this is pretty cheap unless you're running at scale. However, the gotcha is that we would *still* need Power Platform per app/per user licenses to tap into this though - this is because we need to use the HTTP connector to call to Azure, which means that we are in "pay for" Power Platform territory. Assuming we would use the per user licensing, current UK pricing is £7.50 per user per month. 

The impact of Power Apps licensing for HTTP calls

The issue here for our incident reporting app and any similar scenario, is that the Power App can be used by many users. Since our app needs to call into Azure via the HTTP connector, *each* user needs a per app/per user license. Even just 100 users would mean £750 per month, and that's before the Azure costs or costs for any other aspect. So, just when you think you have an extremely cost-effective way of building AI into your Office 365 application, if you're using a Power App as the front-end, you'll find that the Power Platform licensing can get in the way if you envision large numbers of users.

So, pricing for this approach ends up like this - again, PER MONTH and for our different usage levels:


Again, it's the need for Power Apps licensing that makes this expensive, rather than the costs for Azure AI services.

Power Automate (Flow) for AI - pricing

The final option we looked at was using Power Automate to plug into AI. As we detailed last time, this is essentially a wrapper around Azure's Vision API anyway - making the services easily available to a Flow you might create. Is pricing any better here? Well, yes - depending on how your Flow is called. If your Flow is triggered by an item being added to SharePoint, rather than being directly triggered by the user - which is the case in my Incident Reporting app - then only a single user license is required for Flow. Clearly this is very different to requiring each user of the Power App to have a license - the difference is substantial if you have a large number of users, and this is completely valid according to Microsoft's licensing guidelines.

So, pricing for this final approach ends up like this - again, PER MONTH and for our different usage levels:


As you can see, the costs are dramatically different! Removing the need for Power Apps per user/per app licensing for our fictional 200 users is by far the biggest factor, but it also helps that our AI costs are massively cheaper with Azure Cognitive Services compared to Power Apps AI Builder. It seems the conclusion here is that if your solution can be built in certain ways, then you can save substantially on license costs. Some of these aspects aren't specific to the use of AI in our scenario, but are common considerations:
  • Ensuring AI is used via the Azure Computer Vision actions in Power Automate as an alternative approach to Power Apps AI Builder 
  • Ensure your Power Automate Flow is triggered "indirectly" 
    • In other words, the trigger used is either "When an item is created" or "When an item is created or modified" provided by the SharePoint connector. This way the metadata is added to the file in SharePoint after it lands in the document library, and the process isn't triggered by the user directly (e.g. from a button in the Power App)
Of course, these choices only stack up if you or your team are happy to build in this way. If, for example, you don't have skills in Power Automate, this specific approach may not be an option for you.

Summary

There are numerous approaches to AI in Office 365, and they come with a big variance in operational costs. The decisions your implementation team or partner make during the design of the solution will have a significant impact on the TCO of your application! Understanding the techniques to use which can reduce costs but not contravene any Microsoft licensing guidelines is the key to success here - so having the right expertise is vital.

Two principles which can help overall are:
  • Store data in Office 365 where possible - avoiding data sources which require a premium connector (e.g. Azure, SQL, CDS, other SaaS applications) or custom connector means you stay within the bounds of "Power Platform use rights for Office 365" described in the licensing guidelines
  • Use Office 365 triggers for Power Automate - avoiding implementations where the Flow is triggered directly by the user, but instead uses an Office 365 trigger (e.g. SharePoint's "When an item is created", or OneDrive's "When a file is created") will again keep you within the bounds of Office 365 licensing
None of this will be a surprise to people who know Power Platform licensing well, but it's interesting to see a quantified comparison of costs for a detailed scenario. Of course, in many cases storing data in Office 365 will not be the right solution design - perhaps you need true database features such as relationships (one-to-many or many-to-many), cascading integrity, or business rules/triggers related to your data. Maybe you need better support for role-based access. In cases like these, choosing CDS or SQL is likely to provide a better platform and stakeholders need to accept that costs come along with this - but that should be reflected in the value provided by the application.

In any case, these decisions should be made mindfully. Hopefully the information in this article series has been useful!

Tuesday, 3 March 2020

AI in Office 365 apps – choosing between Power Apps AI Builder, Azure Cognitive Services and Power Automate: Part 2

In the last article we talked about some examples of using AI in Office 365, and looked in detail at the the idea of building an incident reporting app which combines common Office 365 building blocks with AI. Whilst Power Apps and SharePoint underpin our solution, we use AI to triage the incident by understanding what is happening in the image. Is this a serious emergency? Are there casualties or emergency services involved? Our image processing AI can interpret the picture, and add tags and a description to where the file is stored in Office 365 - this can drive some automated actions to be taken, such as alerting particular teams or having a human review the incident. We also looked at the results of feeding in a series of images to the AI to analyze the results of different scenarios.

Overall, this article is part one of a series:

  1. AI in Office 365 apps - a scenario, some AI examples and a sample Power App 
  2. AI in Office 365 apps - choosing between Power Apps AI Builder, Azure Cognitive Services and Power Automate (this article)
  3. AI in Office 365 apps - pricing and conclusions
In this article, we'll focus on the how - in particular, comparing three approaches we could use in Office 365 to build our incident reporting app and make use of AI. Which is easier? What skills are required? How long might we expect it to take for each approach?

Choosing between Power Apps AI Builder, Azure Cognitive Services and Power Automate

As mentioned in the last article, there are a number of ways we could build this app:
  • Use of Power Apps AI Builder
  • A Power App which talks directly to Azure Cognitive Services (via a Custom Connector)
  • A Power App which uses a Power Automate Flow to consume AI services
For each approach, we’re looking at how the app would be built, pricing, and any constraints and considerations which come with this option.

Option 1 - Power Apps AI Builder

AI Builder is still in preview at the time of writing (February 2020 - release will be April 2020) with four models offered:

As you might expect, the idea is to make AI relatively easy to use and to focus on common scenarios. No coding is required, and anyone with Power Apps experience can now take advantage of what would previously have been highly-complex application capabilities.
How the app would be built
In our scenario, it’s the “Object Detection” model that is relevant. This can detect specific objects in images that are supplied to it, as well as count the number of times the recognized object is found in the image. The first step is to define a model and supply some sample images:


You'll need an entity pre-defined in CDS to use AI Builder - I'm skipping through a few screens here, but ultimately you select a CDS entity representing the object you are detecting:


In my case, I was building an app related to transport and my entity is "Bus". The next step is to start to train the AI model by providing some images containing the entity:


We then tag the object in each image with the entity:


Once all this is done, you can use the Object Detector control in your Power App and configure it to use this model:


Since the whole topic of how to build apps with AI Builder is interesting, I'll most likely go through this process in more detail in a future article - but hopefully you get a feel for what the process looks like.

In the case of our scenario, we said that we wanted the images to be tagged in SharePoint - and here's where we run into a consideration with AI Builder:

Power Apps AI Builder - great for SOME forms of image detection

The Object Detector capability allows us to detect whether a certain object is in an image or not, and how many times. However, our scenario demanded the capability to recognize *what* was happening in an image, not simply whether a predefined object is present or not! And that's what AI Builder provides - a percentage certainty of whether your single object is present or not. This is much less flexible other forms of AI image processing, and we'd need to somehow supplement this to achieve the goals of our application. After all, we can't provide an AI model with every known object in the universe..

Option 2 - Azure Cognitive Services

Another way of bringing AI into an app is to plug directly into Azure Cognitive Services. As you might expect, this as a developer-centric approach which is more low-level - we're not in the Power Platform or other low-code framework here. The big advantage is that there's a wider array of capabilities to use. Compared to the other approaches discussed here, we're not restricted to whatever Microsoft have integrated into the Power Platform. The high-level areas of Cognitive Services currently extend to:
  • Decision - detect anomalies, do content moderation etc.
  • Language - services such as LUIS, text analytics (e.g. sentiment analysis, extract key phrases and entities), translation between 60+ languages
  • Speech - convert between text and speech (both directions), real-time speech translation from audio, speaker recognition etc.
  • Vision - Computer Vision (e.g. tag and describe images, recognize objects, celebrities, landmarks, brands, perform OCR, generate thumbnails etc.), form data extraction, ink/handwriting processing, video indexing, face recognition and more
    • NOTE - this is the service that's relevant to the scenario in this article, in particular the Computer Vision API's ability to tag and describe images) 
  • Web search - Bing autosuggest, Bin entity/image/news/visual/video search and more 
In terms of what this looks like for our scenario, let's take the following image:


How the app would be built
If I can write some code to consume the Computer Vision API and send the above image to it, I get a response that looks like this (notice the tags such as "person", "indoor", "ceiling", "event", "crowd" and so on:

The code I used to do this is:

Code sample:

The relationship between Azure Cognitive Services and other options

Whilst we're talking about Cognitive Services, it's worth recognising of course that all of the options listed in this e-mail use these services underneath. Power Apps AI Builder, the Power Automate activities discussed here, and many other facilities in Microsoft cloud technologies all use Azure Cognitive Services underneath. When you're thinking about technology options, it's worth considering that the more direct your approach to Azure is, the cheaper it is likely to be.

Option 3 - Using Power Automate (Flow) to consume AI

The final option presented here is to create a Flow which will do the work of tagging and describing the incident report images. This is by far the easiest way I think, and is perhaps an overlooked approach for building AI into your apps - I recommend it highly, Power Automate is your friend. Note, however, that these are premium Flow actions - we'll cover licensing and pricing more in the next post, but for now understand that bringing AI capabilities this way does incur additional cost (as it does with the other two approaches).

In the scenario of our Power App for incident reporting, the simplest implementation is probably this:
  1. Power App uploads image to SharePoint document library
  2. Flow runs using the "SharePoint - when a file is created in a folder" trigger
  3. The Flow calls Azure Cognitive Services (using the native Flow actions for this)
  4. Once the tags and image descriptions have been obtained, they are written back to the file in SharePoint as metadata
The beauty is really in step 3. Since Microsoft provide hooks into many AI services as Flow actions, infusing AI into your app this way is extremely simple - no code is required, and it's as simple as lining up some actions in the Flow. Some skills and experience in Power Automate are certainly required, but the bar is certainly much lower than the other options. 

Here's what my end-to-end Flow looks like:

In more specific terms, the trigger is on a new file being created in the SharePoint site and list where my Power App pushes the image to:

For each file that has been added, I get the file and then call:
  • Describe Image Content 
  • Tag Image
The Flow section below shows how we get the details of the file added to SharePoint to be able to pass the contents to the Azure actions for processing:
On the Power App side of course, I need something to use the camera on the device to take the photo and upload the file to SharePoint - but that's not too complex, and it's just a question of adding the Power Apps camera control to my app to facilitate part of that. Of course, a major capability of Power Apps is being able to plug into device facilities such as camera, GPS and display functions, so it should be no surprise that's simple. If you remember, I showed my sample app briefly in the last post:


However, I do need to do some work to get my image into SharePoint once it has been captured - in my case I use the integration between Power Apps and Power Automate to do this. I create a Flow which uses the Power Apps trigger and ultimately uses the SharePoint "Create File" action. The important part though, is the Compose action in the middle which uses the "DataUriToBinary" function to translate the image data from how Power Apps captures it to how SharePoint needs it:

I then link the Flow to the Power App:

I can then use this in my formulas, as:

UpdateContext( { PictureFilename: "Incident_" & Text( Now(), "[$-en-US]yyyy-mm-dd-hh-mm-ss" ) & ".jpg" } );

IncidentPhotoProcessing.Run(PictureFilename, First(Photos).Url);

..and there we go, a fairly quick and easy way to get the photo for my incident into SharePoint so that the AI can do it's processing.

Summary


We've looked at three possible approaches in this post to building an Office 365 application which uses AI - Power Apps AI Builder, use of Azure Cognitive Services from code and use of actions in Power Automate which relate to AI. The findings can be summarized as:
  • Different skills are needed for each approach:-
    • Power Automate is the simplest to use because it provides actions which plug into AI easily - just build a Flow which can receive the image, and then use the Computer Vision actions shown above
    • Direct use of Azure Cognitive Services APIs requires coding skills (either use provided SDKs for .NET and JavaScript etc. or make your own REST requests to the Azure endpoints), but is a powerful approach since the full set of Microsoft AI capabilities are exposed
  • Capabilities are different across the options:-
    • Power Apps AI Builder has some constraints regarding our image processing scenario. The "object detection" model is great for identifying if a known object is present in the image, but can't help with identifying any arbitrary objects or concepts in the image
    •  Azure Cognitive Services underpins all of the AI capabilities in Office 365, and offers many services not exposed in Power Apps or Power Automate. As a result, it offers the most flexibility and power, at the cost of more effort and different skills to implement
  • Requirements and context are important:-
    • In our scenario we're talking about a Power App which captures incident data and stores it in SharePoint - in other words, we've already specified that the front-end should be Power Apps. In this context, integrating Azure Cognitive Services directly would be a bit more challenging than the other two approaches (but is relatively simple from a coded application). In Power Apps, we'd need a custom connector to bring the code in (probably in the form of an Azure Function), and that's certainly more complex than staying purely in the Power Platform 
    • In the design process, other requirements could lead to one technical approach being much more appropriate than another. As another example, if the app needed a rich user interface that was difficult to build in Power Apps, the front-end may well be custom code. At this point, there's an argument for saying that using code for the content services back-end of the application also makes sense too
As usual, having a team or partner who understands this landscape well and has capability across all options can lead to the best result. In this case, all options can be on the table rather than being limited to one or two because of skills. The architecture decision can be merit-based, considering the use cases and scenarios for the app, the AI capabilities needed, the user experience, the range of devices used, speed to implement and cost.

And cost, of course, is the element that we haven't covered yet! Let's discuss that in the next post: