Tuesday 29 December 2020

SharePoint Syntex - training Syntex to read your documents like a human - part 2 (entity extractors)

In the previous article we looked at how to get started with SharePoint Syntex, covering in particular the initial steps of creating a document understanding model. In this article we'll look at how Syntex can extract content from your documents - allowing you to unlock "golden" information so people don't have to open 10 documents to find what they're looking for. Before we get into things, remember that a document understanding model can have two elements:

  • A classifier - this allows Syntex to identify what type of document it is (e.g. a "C+C Statement of Work" in the example I'm using)
  • An entity extractor - unsurprisingly, this allows Syntex to extract information once trained

We'll focus on the entity extractor today, and this is the fun part. If you remember our scenario from the last article, I'm extracting the total value from each Statement of Work document I have in Office 365. Here's what that looks like - it's the 3rd highlighted rectangle here:

If you remember, creating both a classifier and an extractor uses this process:
Syntex needs some training files to use as we're developing the AI model, but in my case I added these last time when I created the model initially and defined the classifier. As you might imagine, these are some test Statement of Work documents with one or two others thrown in there - the "others" are used to train Syntex about "negative" cases. These go into a special "Training Files" library within the Content Center, and I'll use those same files for the extractor.

Implementing an entity extractor in the AI model

The first step is to head back to the Content Center and find the model you're adding the extractor to:

Once in the model, choose the "Create and train extractors" action:

Next, name your extractor and specify if you want the data to be extracted to a new column on the SharePoint library (and the data type if so) - usually you do. Since I'm extracting the total value from each Statement of Work, so the name I use is "Engagement value": 

We're then taken into the "Label" tab, the first step of three when defining a classifier or extractor. 

Creating the extractor - labelling step

 
Accuracy requires labelling and "explanations"
When labelling your files for an extractor, you are teaching Syntex where the value is in your sample files. But as we'll see, simply showing Syntex where it is in a couple of files isn't enough. We need to create "explanations" too - the AI engine uses both pieces of info.

Here, we are dealing with the labelling step.

In the labelling tool (where all formatting is removed from the document), I find the costs table which is present in all of our Statements of Work and I highlight the value from the total row:

I then hit the "Next file" button and repeat for the next document in the training files library: 

Once I've labelled at least five files, I move to the "Train" tab.

Creating the extractor - explanations step

For the training part of the process, we create one or more explanations to help guide the AI further. When we created explanations for the classifier, we were providing Syntex with patterns to help identify and classify the document. For the extractor, we do something similar but here we are providing patterns to guide Syntex to the content we are trying to extract.

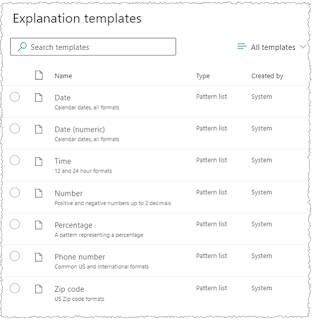
Explanations can be created from scratch or from a template:

Templates already exist in the system for common pieces of info you may want to pull out of documents - for example, dates, numbers, phone numbers, addresses and so on:

For the sake of learning I'll create my explanations from scratch, even though the first one is actually a currency value and a template exists for that. I give it a name, choose the Pattern list type and provide the variants to account for how the engagement value may be written in my documents (different number formats):

I then save this explanation and create another one. This time I'm helping the AI find the overall section within our SOW documents which the costs table can be found in - I'm simply looking for the title of that section, "Fees and Payment":


I create one more to find the phrase "Total".

Now that I have all of those, I combine them so that I can essentially say "first, please find the phrase 'Fees and Payment', then 'Total', THEN the thing that looks like a GBP currency value. I do this by creating a new explanation of type "Proximity" - and specifying how far apart each element is. Syntex uses the concept of tokens to specify proximity, and my resulting explanation looks like this:   

More accurately, I'm saying "first find the 'Fees and Payment' phrase, then find 'Total' which is more than 20 tokens away but less than 100. Once there, find the thing that looks like a GBP currency value which is VERY close, in fact less than 10 tokens away.

As you can imagine, tuning the tokens in a proximity explanation helps the accuracy of the AI and reduces the chances of Syntex being unable to find your content. My final set of explanations looks like this - it's the 3 phrase or pattern explanations AND the proximity explanation which combines the others:

Creating the extractor - training/testing step

I'm now ready to train and test. Similar to when I did this for the classifier, I select some training files which haven't been used in labelling (including one document that isn't a Statement of Work):


The "Prediction" column then tells me what Syntex predicts would be the extracted text for each document. Success! This looks good:


That's almost a 100% success rate - but you might notice that the model failed to extract content from one SOW document, and indeed Syntex tells me this:


Upon further inspection, this particular document seems to have a structure different to what I'm expecting - specifically, I find that the author has used a different heading for this section of the document!


So at least I understand why this is happening - I can now tweak my explanations if this is an expected case, or politely remind the project manager that they should be following our standard structure! Either way, there's a path to resolving this. 

I now finish the process by clicking on the "Exit training" button:


Seeing results - applying the model to document libraries

Our work is now done! We have a completed AI model and we can apply it to document libraries around the Microsoft 365 tenant:

A Syntex AI model does need to be applied to libraries individually, but in most cases your documents of a certain type may not be distributed that widely anyway. In the future, we can expect APIs and provisioning mechanisms to manage this at scale.

Once the model has been applied, Syntex extracts the content I trained it to - meaning I don't need to open each individual document:

Summary

We've now seen the process of creating a document understanding model in SharePoint Syntex - something that will allow us to recognise the document AND extract content from it. We can take this further too. Instead of just extracting a single piece of information (e.g. the value from a Statement of Work) we can, of course, extract multiple pieces in the same extractor.

Overall, these capabilities of Syntex provide a great leap forward in terms of how information can be found. High value information no longer needs to be buried inside documents, meaning that employees either do not see it or are forced to open many individual documents to find it. We can create mini-databases and tools from content that was previously locked away - including capabilities which provide sorting, filtering and powerful search experiences. To the future!

Sunday 13 December 2020

SharePoint Syntex - training Syntex to read your documents like a human

A long time ago, when the human race started to use ink to inscribe information on parchment or papyrus, this was a great leap forward from carving into stone or clay. Information became easier to create and transport, and knowledge instantly started flowing in ways it had not done before. Today, *all* of us are closely tied with the process of creating, sharing and consuming documents - the world literally revolves around them.

But documents have their constraints of course. Critical data and knowledge gets buried within them, leading to a series of challenges that mean very few organizations truly get value from the content they create. You might be familiar with the statistic from McKinsey research that the average knowledge worker spends 20% of their time (a day per week!) just searching for information or expertise within their company. That could be conservative though - IDC's Knowledge Worker survey (behind paywall) suggests the figure could be closer to 30%.

One of the reasons for this is that documents generally need to be opened to access their information - and it's inherently time-consuming to open 20 documents to establish which one has the information you're looking for. As you might know, Viva Topics and SharePoint Syntex introduce AI-powered capabilities into Microsoft 365 to solve several aspects of the knowledge challenge. In this post, we'll look at SharePoint Syntex, and how to teach it to:

  • Automatically recognize different types of documents - usually from some consistent content within the document (e.g. the phrase "Statement of Work") 
    • This means the document can automatically inherit a retention policy or appear in search results in a certain way (for example), all without a human tagging each document. In Syntex, this is a Classifier
  • Pull specific information out of documents - meaning that high-value data is no longer locked inside documents, whether you have 100 or 100 million.
    • With this capability, the specific information is pulled out of each document and stored as metadata in SharePoint columns. In Syntex, this is an Extractor

An example in my company

At Content+Cloud, two of our most common document types are Proposals and Statement Of Work documents - no surprise given that we deliver projects and services. I've redacted the numbers, but here's what the costs/investment table looks like in one of our real SOWs:

I've highlighted a couple of things in the image above. When I'm opening the document to find the total value of the project, as a human my brain is instinctively following this process:

  1. Find the "Fees and Payment" section
  2. Look for the "Total" row
  3. Find the £ value that is in that row

In this article, we'll teach SharePoint Syntex to do the same thing (in addition to recognizing Statement of Work documents in the first place). Syntex can then pull out the project value from 100s or 1000s of our SOWs much faster than any human ever could. Given that we create many SOWs each week, knowing that the technology can stay on top of this unlocks further benefits. 

Creating a document understanding model in Syntex

I'm going to skip over the initial pre-requisite step of creating a Content Center in your Microsoft 365 tenant - quite simply, this is done in the SharePoint admin center for your tenant, and "Content Center" appears as a new site type. Once you have that, you can begin creating models. We're going to do two things here:

  • Create a Classifier so that SOWs can be identified
  • Create an Extractor so that the value can be extracted
In both cases, we follow this process:

To start, navigate to your Content Center and click the "Create a model" button:

Give it a name (in my case it's a Content+Cloud Statement of Work) and choose whether you want to create a new content type or use an existing one:

Notice that you can also specify a retention label for this model. This is huge step forward in helping organizations meet their compliance needs! Once trained, not only can SharePoint Syntex automatically recognize a Statement of Work within my tenant (regardless of which site or Team is it stored in), it can ensure these documents have appropriate information governance applied. For our company, a Statement of Work is a contractual client document - and as such we should retain it for a number of years by default. Syntex makes this possible without a human needing to label each SoW - and the pattern recognition we'll see provides the power and flexibility to recognise reliably.

In this step I see all of the published retention labels in my tenant: 

Now that we've created our model, the first major configuration step is to add some files for training - we can use these to train both the Classifier and the Extractor. The training files should be a set of test files which are Statements of Work, but also at least one which isn't. I supply some files as shown:

The "Training Files" library is a special document library within the Content Center where these files go. It's common to stack up files from different models you build here (as shown below), but essentially you're adding a set of files you're previously gathered up each time you build a model:

How many training files do I need?

Syntex requires you to add at least 5 files which match the document type you're working with, and at least 1 which isn't. However, the best idea is to gather up and add more than 6 files because you'll use them in two steps:
  • Labelling at least 6 files during initial training
  • Using the remaining unlabelled files to test your model

Creating the Classifier


Now we have some training files, click the "Train classifier" button:

Creating the Classifier - labelling step


In this step we're on the first tab ("Label") and we're essentially telling Syntex which of those training files are the ones which match the content type (in my case, a C+C Statement of Work) and which are not. Within the labelling tool, the interface provides a toolbar with "Yes" and "No" buttons to do this (highlighted below):

I step through each of my training files and click the "Yes" and "No" buttons appropriately - this is how labelling is done for a Classifier. Once done, the model trains itself automatically and the "Label" column confirms the status:

Creating the Classifier - explanations step

Now move to the "Train" tab. We now need to add one of more "Explanations" - these help the model further, since just having some labelled sample documents isn't enough. Think of this as the system needing to understand more about the patterns that identify this document type.

To start, click the "New" button within the Explanations area - notice that you can start from a blank example or from a template:

Templates, in case you're wondering, are for common snippets of content which may help classify (or you may want to extract from) a document - dates, phone numbers, zip codes, currency amounts, e-mail addresses and so on):


In this case, we can create from blank. What I'm going to do is create a phrase list explanation, using a phrase which is only found in a Statement of Work - when doing this, one thing to look out for is that often you can't use the simple case alone. For example, the phrase "Statement of Work" appears in many of our other documents which aren't actually Statements of Work! So instead, I'm using something from the small print that will only be in a SOW - in the image below, you can see it used as my phrase and also on the right in the simplified document view:


Click "Save" to finish creating the explanation.
 

Creating the Classifier - training/testing step

Now it's time to test the Classifier. To do this, move to the "Test" tab and click the button to add example files:


I can now select some previously added example files - these need to be files I haven't already used in the labelling process. To test properly, I select some documents which are SOWs and some which aren't:


Click the "Add" button and the files will be used for the testing. What you should see is that the model has correctly identified the documents which are a positive match, and others show as negative:


Excellent!

At this point, the "Classifier" part of our AI model is complete - Syntex will now be able to recognize this type of document anywhere in the Microsoft 365 tenant. The model can now be applied to document libraries and the content type we created or used will be applied:


As any experienced SharePoint or Microsoft 365 practitioner knows, there are SO many possibilities now that the content type is known. From automated workflows, information protection policies, filtering and special appearance in search results through to document lifecycle aspects such as retention and disposition - the list goes on. 

But let's not stop there - before we complete the final steps of making this happen, we'll do more than just identify the document type. In the next post, we'll go back to where we started by implementing an "Extractor" in SharePoint Syntex to pull out the Statement of Work value - thus ensuring it's not buried in each document.