Wednesday, 9 June 2021

Using RPA to control my ISP settings for kids gaming - Power Automate Desktop for web automation - part 1

Like many families, we have annoying kids who would spend all their time gaming or on screens given half the chance. So, our tyrannical regime approach essentially grants them a certain amount of time per week, with controls put in place through our ISP which allows me to block or allow individual websites. Unfortunately with my ISP (Virgin Media here in the UK) there's no scheduling capability for this, only for parental controls overall - which means I have to manually go the portal and tap in the sinful URLs many times per week, and then unblock later on. A recurring conversation in our house goes something like this:  

  • Kid - "Dad, you know how you block our gaming websites when it's not gaming time so we can't sneak on?"
  • Me - "Yes?"
  • Kid - "Well, you're always on calls when it's 5pm on a gaming day and we're losing lots of time. It's so unfair! Can't you schedule it or something?"
  • Me - "Sorry son. Despite using a company who claim to be the UK's leading ISP and paying them through the nose each month, they chronically underinvest in their management portal and it was built by interns in the 1990s. There are no APIs either, so it's not possible unfortunately. Trust me, I'd like nothing more than to never visit that thing again or have notes shoved under the bedroom door when I'm on calls - but that's life son."
  • Kid - "Erm. Could we not just......turn the controls off?"   
  • Me - "Hahahahaha!"

After the 86th iteration of this conversation, I decided to spend a weekend looking at Power Automate Desktop for this since it does web automation. Microsoft announced in March 2021 that Power Automate Desktop is now free with Windows 10 as they expand the Power Platform into other forms of automation. In truth, the licensing means that if you want true unattended execution (rather than attended automation where you manually press a button and all the steps execute for you), Microsoft's RPA technology is more suited to workplace scenarios than home or personal automation. I'll talk more about licensing in the next article. Nevertheless, my ISP scenario was a good excuse to automate something else and try another scenario with Power Automate. 

What I'm automating

The basic process can be described as:

Once logged into the Virgin Media portal I can manage my "web safe" settings through a series of tabs. I'd need the automation to load the website (ensuring the session is authenticated with my credentials), and firstly navigate to the "Websites" tab shown below:

The websites tab provides an interface to specify the sites to block. I leave some sites permanently blocked, but what my automation needs to do is come in here and add or remove the "scheduled" websites. As the numbers in the image below depict, it's a 3-step process involving the URL being typed into the box, the "Add" button click and then settings applied with the "Apply" button once all changes are in:

The unblocking is effectively a reversal - this time the automation needs to find the right entries in the list and click the "Remove" link next to each. This involves a slightly different series of steps and there are a couple of ways in Power Automate Desktop to do this, but we'll get to that later. 

Getting started with Power Automate Desktop

Given that the tool is all about automation from the desktop (although cloud-integrated), we need to download some software. There are a number of ways you can do this, including from the "Install" menu within the Power Automate portal:


Once installed and signed-in, your machine effectively has a binding to a Power Platform environment:

Power Automate Desktop capabilities

The overall capability set is very powerful indeed, and of course the whole premise of desktop automation is that you can record (or manually create) steps which drive keyboard and mouse actions. You can open applications and browser windows, interact with their controls, and perform steps in systems that would be otherwise difficult to automate. Here are some of the things you can do:

Control elements of the desktop PC:      Work with files and folders:

Control applications through UI automation:     Control applications through web automation:

This distinction between "web automation" and "UI automation" is important - we'll come back to this later, but notice there are some similarities and some differences between the possible actions.

Overall, the toolbox covers many different areas of automation and there are almost infinite permutations of how these things can be combined:

Now let's look at the specific process to implement the automation I need.

Getting started with Power Automate Desktop

Like other desktop automation software, Power Automate Desktop brings a recorder to allow you to record the screen as a one-time operation to create your automated process. Whilst you *can* create your automation by directly dragging and dropping actions from the toolbox, in most cases you'll use the recorder somewhere in there. In fact, there are two:

  • A web recorder
  • A UI recorder
These are represented as two icons at the top of the designer:

As we're talking about this distinction, here's a tip:

Tip #1 - Web automation vs. UI automation
Since it's web automation I need to perform, using the web recorder is likely to give me the best results since it has a deeper understanding of browsers, web page structure and HTML input elements such as textboxes, radio buttons and dropdowns. The UI recorder is more suited to automation of desktop apps. This rule of thumb works in most cases, though I could imagine the occasional need to use UI automation in the browser (e.g. for a particularly complex web UI where pixel locations are more effective than navigating a DOM structure or dealing with content represented in images).

When using the web recorder you choose which browser to use - regardless, you'll always need the Power Automate Desktop browser extension installed and enabled (here are the links for Edge and Chrome). You select your browser of choice to get started:

Tip #2 - Chrome vs. Edge
At the moment, web automation with Chrome seems to be much more reliable than with Edge. The notorious "failed to get window" error seems much more common with Edge, and operations that fail in Edge tend to just work in Chrome. For now, I recommend switching to Chrome if you're trying with Edge but run into unexplained challenges.

As you record the steps you want to automate, they are captured by the Web Recorder:

In the end, my automated process looks for blocking the websites looks like this:

Tip #3 - use variables in your automated steps
Whilst the recorder will do a good job of detecting text you type into forms, replacing these with variables to more clearly separate out the values is a good idea. They become easier to replace and less buried in your script - just like in code.

In my case I have variables for the two websites I want to block and my Alexa access code:

The result

The video below shows the automated process in action - some observations:
  • It happens very fast :) 
  • It's hard to see what happens because some UI elements are off-screen or barely in the screen - however the web automation doesn't care about this 


Reversing the process - unblocking the sinful websites


As you might expect, I have a similar process to reverse the actions - in essence I have two distinct Flows (which can be scheduled independently):

In my case, unblocking is a little more challenging because I have to identify the correct sites in the list. This proved to be one of those web automation challenges where it takes more than the recorder to nail the steps. I found myself with two options:
  • Identify the right CSS selector to find the element with "roblox.com", and navigate in the DOM to a sibling element which is the "Remove" hyperlink
  • Leverage the fact that the websites I'm removing will always be the last ones in the list. This was far simpler!
In the end I used Power Automate Desktop's ability to run some JavaScript on the page you're automating - very powerful! My actions looked like this:

The final step - announcing to Alexa

Since the whole problem scenario is the fact that I'm often on calls, I needed to signal to the kids that gaming was either available or unavailable. Alexa automation is a world I hadn't really dug into until now, but I found there are essentially two ways of getting what I wanted -
  • Alexa Notifications - this pings the Alexa devices, but only in a "you have a notification" way. To listen to the notification, someone has to say "Alexa, read me my messages", which is sub-optimal for what I wanted
  • Alexa Routines - this allows you to do any number of things, including make an announcement in the true sense with no "pull" of the message required
To integrate with Alexa Routines, I used the Virtual Buttons Alexa skill - this is a service which abstracts the triggering of Alex Routines and gives you a REST endpoint to call. If you want more than one virtual button, and I did because I wanted two different announcements, the service is chargeable but the cost is fairly negligible and it does seem to simplify things.

There's some setup work to do, but the steps are documented in an e-mail the service creators send. Part of the process involves defining the Routine in the Alexa app - in this case, to announce "Sorry kids, gaming is blocked" or similar:   

To integrate this into my automated process, I made use of the "Run PowerShell script" action in Power Automate Desktop and called the REST API through Invoke-RestMethod, passing the appropriate JSON in the body to call make the blocked/unblocked announcement as needed (via the Virtual Button ID):

Summary

Solution complete! I now have an automated process which opens a browser, drives the keyboard and mouse to make the changes to my ISP settings, and announce to Alexa when done - fantastic.

Except at this point, things aren't fully automated in an unattended sense - up to now, I have a button to click in Power Automate Desktop which will fire up the browser and execute the steps. I have to press the button manually though. The next step is to make this an automated process that runs from the cloud on a schedule. So next time, we'll talk about:

  • Turning this into a cloud Flow which runs on a schedule
  • Licensing considerations for Power Automate Desktop
  • Authentication challenges and solutions
For the last point, I'm talking about things like this - Captcha image verifications which are designed to foil malicious automation:


More on this next time!

Thursday, 13 May 2021

Speaking at ESPC21 - using Power Apps and AI for Incident Reporting

The European SharePoint, Office 365 and Azure Conference has always been one of my favorite events in Microsoft technology, and I'm looking forward to delivering a session at the event again this year. The event is running on June 1-2, and the good news of course is that you can attend with no travel required. I can guarantee you will have no problems with travel AC adapters! ESPC always has amazing content, and as usual there are keynotes and announcements from Microsoft execs such as Jeff Teper, Karuana Gatimu, Charles Lamanna, Adam Harmetz and others. 

I really like what the conference has done with pricing when in "virtual mode" - there's a free registration option, but also pay-for choices which get you many extras including on-demand session access, certain bonus sessions and a choice of pre-event tutorials. There's a link to pricing and the conference schedule at the end. 

Some details on my session:

Building an Incident Reporting Solution with Power Apps and AI

AI is no longer a high-end concept that only applies to organisations with large I.T. budgets. Instead, it is readily available in numerous ways in Microsoft cloud technologies, and when your content is already in Microsoft 365 it's easy to tap into. The scenario used here is incident reporting, but the approaches shown in this session can apply to *many* common applications.

Using a combination of Power Platform and Azure Cognitive Services, we'll show how to add image recognition and tagging to an app in a few easy steps. This session is aimed at developers, citizen developers, and anyone else building solutions in Microsoft 365.

Session link: Building an Incident Reporting Solution with Power Apps and AI

I will be taking any questions you may have live during my session, so come prepared! 
As a speaker at ESPC21 Online I can share with you a special 25% discount on Pro Access tickets, which includes a pre-event tutorial of your choice, all event sessions on demand and more. If interested, just use code ESPCPRO when booking here
You can find the full event schedule here and check out some of ESPC’s reasons why you don’t want to miss this event here. I hope to see you at ESPC21 Online!
Thursday, 22 April 2021

SharePoint Syntex - teaching AI to extract contents of structured documents with Form Processing

In previous articles on SharePoint Syntex I've talked mainly about the document processing approach - in this post I'll discuss it's counterpart, form processing. For those following along, my overall set of articles on this theme so far are:

Syntex - document processing

Syntex - general
That last article in particular is designed to help you understand the difference between the two models and when to use each one. As you read about Syntex you might form the view that "form processing is for things like invoices and order forms and document understanding is for everything else" - certainly some of the guidance infers this. However, that position is far too simplistic - there are differences in licensing, capabilities, supported file types and more - and you'll want to get this decision right to avoid having to rework AI models. My "tips for choosing" article might be helpful since it has a table of differences and details of licensing aspects to look out for. 

But today, we focus on form processing!

Syntex form processing - integrated AI Builder

As the briefest of recaps, Syntex form processing is typically more suited to highly-structured and consistent document formats compared to document processing, that much is true. Since the AI Builder technology within Microsoft's Power Platform is used, there are a few implications to consider:
  • To use, AI Builder credits are needed in addition to Syntex licenses (see AI Builder calculator). However, if your org has 300+ Syntex licenses you receive a generous allowance of 1m credits - this more than gets you started
  • Supported file types include JPG, PNG or PDF - but not Office files
  • Entire tables can be extracted from the document (in contrast to document processing)
  • The model is applied via a Power Automate Flow to the SharePoint document library where your documents reside (i.e. where you create the model from) - but there is no easy way to use this in other locations
In short, it's AI Builder conveniently built into SharePoint document libraries - so you don't have to do the integration or somehow pass each document to the model, it's taken care of for you.

Our invoice format

Before we get started on the process, it's worth seeing the format of documents used in this process. Like many classic examples of this type, they are invoices:


Implementing Syntex form processing

The approach followed here can be summarised as:
  1. Define the information to extract (i.e. teach Syntex what the fields are e.g. "Invoice Reference", "Invoice Date" etc.)
  2. Add documents for analysis
  3. Tag documents (i.e. teach Syntex where to find the relevant content in the document)
  4. Train the model
  5. Test
  6. Use in your document library
In your SharePoint document library, find "Automate" > "AI Builder" > "Create a model to process forms":


You'll see this message alerting you that AI Builder credits are needed:

Give your model a name - I'm using "COB invoice" for now. I want a new SharePoint content type to be created with this name so these documents are easily identified and classified amongst any others:

Syntex then begins to create your AI model:


Once the model has been created we define which information within the document we want to extract:

As the image shows, I start specifying some things I want to extract such as:
  • The invoice date
  • The invoice reference
  • The VAT number
Syntex now allows me to supply a collection of documents to train the model:

I create a new collection of documents for my invoice scenario:


I have some invoices ready to go, so I select those to upload:


Once uploaded I'm ready to analyze!


Once the analysis is complete we move into the tagging phase

The tagging phase

As you move your mouse, Syntex allows you to highlight portions of the document by drawing boxes around identified pieces of text. By doing this, you map them to the fields you defined at the beginning - these appear in a picker for selection, with a checkbox indicating whether you've already mapped this item. So I move through the document teaching Syntex what is the invoice reference, what is the date, the supplier name and so on.


As you can see, Syntex allows me to pick something as granular as an individual word or even character, or expand to pick a phrase or string of characters. Items with a green border are already tagged:

Tables can also be tagged in this way:
Once I'm done tagging I'm presented with a summary of the model, with a list of the fields I've defined:


We're now ready to move into the training phase

The training phase

We start by hitting the Train button:


Once the model has been training you can either run a quick test against a new document (not one used for training) or go ahead and publish it to your SharePoint document library:


Let's go ahead and publish the model. Once I have a published version, any subsequent changes will create a draft - this allows me to test things out (and get them wrong) whilst not disrupting the extraction that's already in place.

Once a model is published, we can go ahead and use it:


This makes the model available for use in a Power Automate Flow, and the person using will need to consent to the connections being used:


The resulting Flow looks like this:


If you're interested in the mechanics, the piece that does the extraction is this - the "Predict" action for AI Builder which links to the model we just created:


The results

So let's go back to the invoice format we are using:


When this file is uploaded to SharePoint, initially it's just any old document:


..but then after a couple of minutes the document is correctly identified and classified as a "COB Invoice" and the values I trained the model for are extracted:


Excellent. Now I can drag in many old invoices and have them properly classified and summarised:


..and after a couple of minutes:


Conclusion


Syntex is hugely powerful in automatically unlocking critical data from documents - it doesn't need to be buried inside any more. At the beginning of this series, we discussed how the best research suggests knowledge workers spend 20-30% of their time just searching for information or expertise, and many of us would recognise that having to open many documents to check their contents can contribute to this. As above, I can build SharePoint document library views so that information is readily-accessible or the view is sorted, filtered or grouped according to extracted information.

These benefits go far beyond search and views though. Having my documents correctly identified means that I can apply security and compliance policies to them, for example a conditional access policy which means employees can't print or download sensitive contracts from an unmanaged device, or a retention policy that means a Master Services Agreement is retained for 6 years. Syntex can drive these approaches so that policies are applied by the AI recognising the document, and this can work across documents of wildly varying formats so long as there's some consistency that a document understanding rule can be applied to.

Being able to automatically extract information also means I can build process automation around my documents, for example if something comes in for a certain region or above a certain value, I can route approval processes or notifications accordingly. There are many possibilities here alone. 

Ultimately it comes down to classification and extraction, and there are so many possible use cases around CVs, proposals, statements of work, RFPs, employee contracts, invoices, sales/purchase orders,  service agreements, HR policies and just about any other document type you can think of. This is democratised AI in action, and it's great to have it so accessible in SharePoint.   

Thursday, 1 April 2021

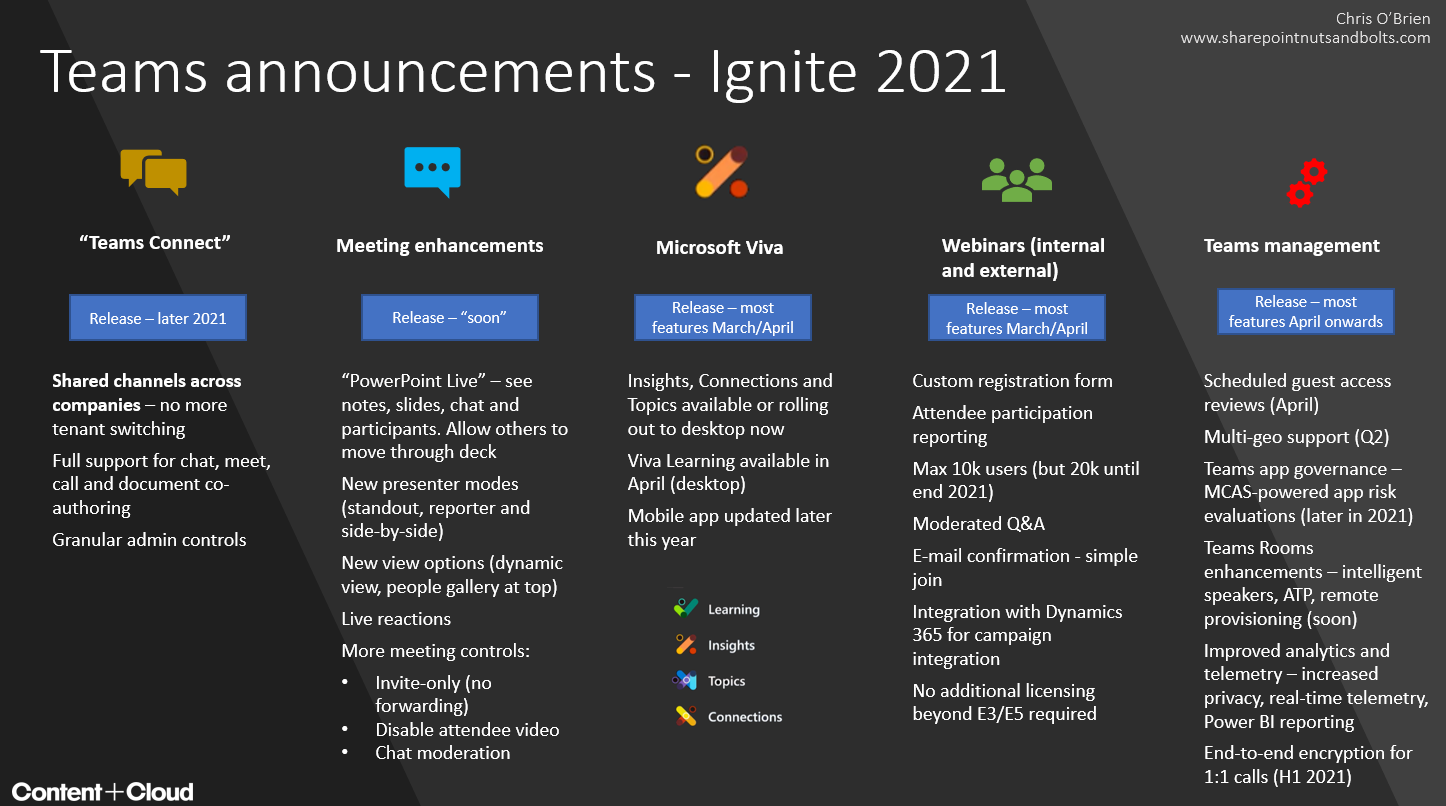
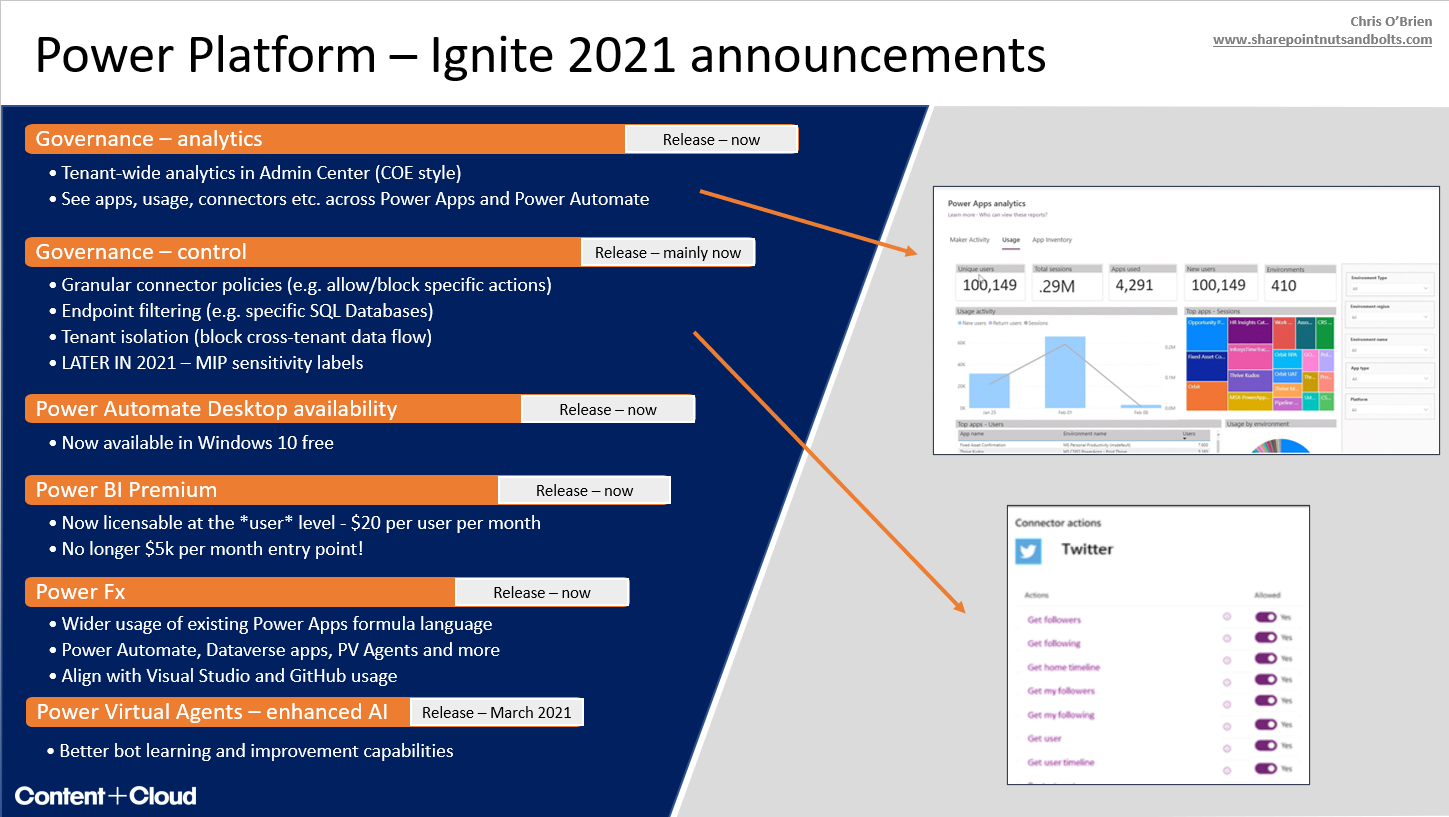
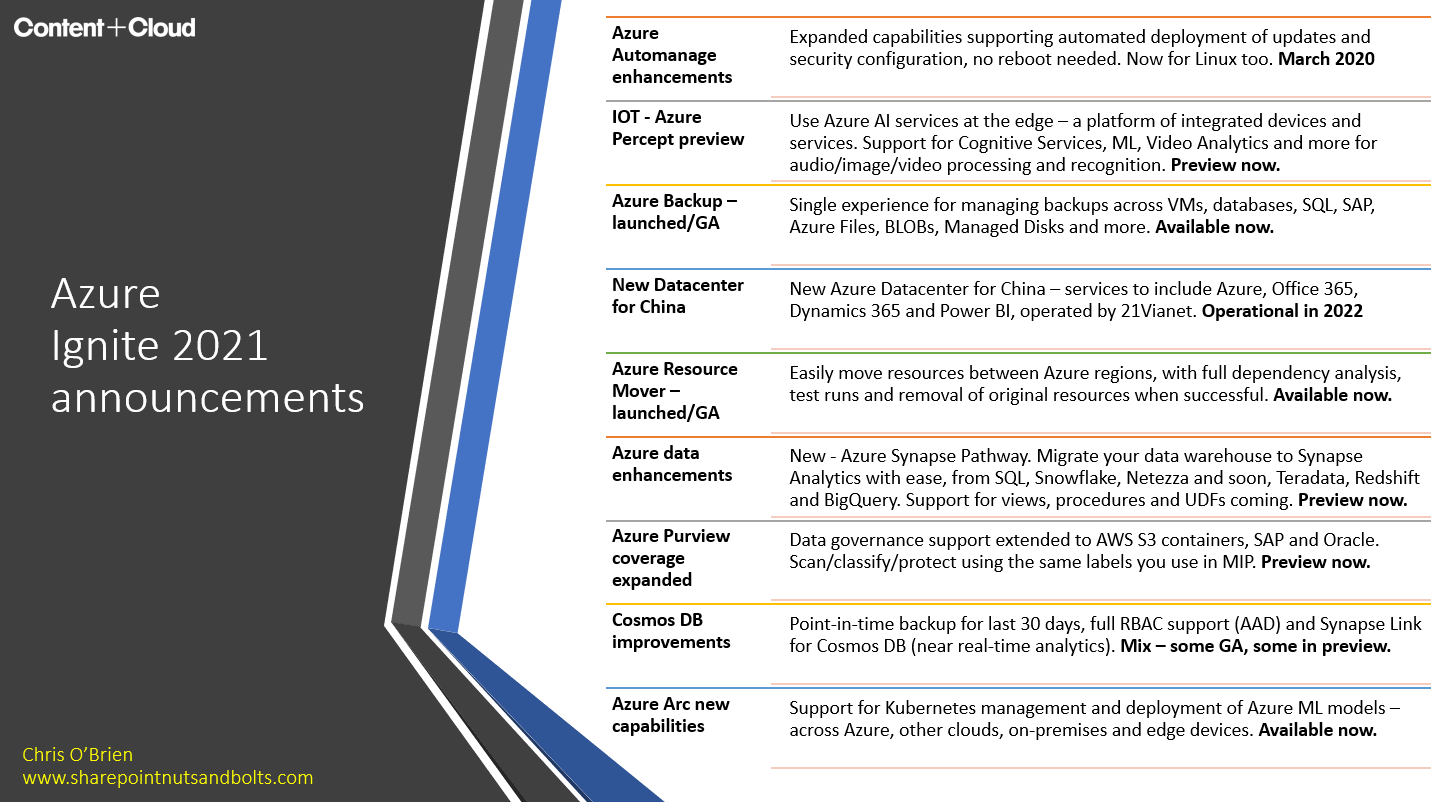
Ignite 2021 announcements summary - Teams, Power Platform, Azure, Security and Compliance

Microsoft announced a lot of changes and enhancements to their cloud products last month at Ignite, their major conference. Keeping up with the firehose of constant change is difficult at the best of times, but the flurry of announcements at these events - not to mention minor updates masquerading as major announcements - only makes it more difficult. You'd be forgiven for missing some key developments frankly. Whilst the "Ignite Book of News" that Microsoft create is useful (link at the end), I find myself needing a more concise summary - something I can reference when talking to my team or with clients. All of which leads me to my "Ignite on a slide" summaries that I'm sharing here.

In this post you'll find slides as images, and a downloadable deck which combines all of them - I cover the following technologies:

  • Teams
  • Power Platform
  • Azure
  • Microsoft Security & Compliance

Feel free to re-use or share.

Microsoft Teams


(Click to enlarge)

Microsoft Power Platform


(Click to enlarge)

Azure


(Click to enlarge)


Security & Compliance


(Click to enlarge)

Of course, my summaries are somewhat subjective and you might feel there's something I've missed - but hopefully they're useful somehow.

Download the combined deck

Summary

Hopefully these summaries are useful in some form and you're free to use them as you like. When you need more detail on any of these announcements (and you will), I highly recommend using Microsoft's published "Book of News":

Link:  Ignite Book of News

Sunday, 28 February 2021

SharePoint Syntex AI - tips for choosing between structured and unstructured document understanding and form processing models

SharePoint Syntex, the AI-powered document understanding capability of Microsoft 365 which was previously part of Project Cortex (we'll come to that in a second), provides two approaches to understanding your content in structured and unstructured document understanding. I talked about document understanding in two previous articles:

However, document understanding is only 50% of the Syntex capability. Unstructured document understanding is more suited to very structured documents such as invoices, receipts, and order forms - but there's a lot more to the decision than that. On the surface, many of the document AI processing scenarios you might consider could use either approach - but whilst there's huge overlap, the two models have some significant differences in capability, licensing and how they are applied.

Choosing the right approach can be confusing at first, so that's the focus of this article. You'll find the decision between structured (previously known as "form processing" as in the image above) and unstructured document understanding comes up frequently as you work with Syntex - I also cover it in SharePoint Syntex AI - my top 5 real-world tips.

But first, did you know that the "Project Cortex" label is disappearing?

Microsoft's Viva - branding and naming changes

With the advent of Microsoft Viva, the "topics" part of Project Cortex has become "Viva Topics" and is part of the that product set. The retirement of the Cortex brand label also means that Syntex becomes it's own thing. Indeed the Syntex add-on for Office 365 didn't use the Cortex label once launched - so in the Microsoft 365 admin center you'll see:


So a quick summary of the original naming compared to the current naming is:

With that out of the way, let's get back to unstructured document understanding. 

Structured vs. unstructured document understanding - what to use when?

So how do the structured and unstructured models differ? When would you use each one? Microsoft have a fairly useful article at Compare custom models in Microsoft Syntex, however some of the biggest differences lie in how the AI models are trained and what they're capable of, something the article doesn't really cover. I think things can be clearer still - here are the major differences as I see them:


Aspect Unstructured document understanding Structured document understanding
Best suited for Unstructured or less structured content - documents can be written in different ways Highly structured content - based on a specific format with high consistency
Capabilities Classify your documents/identify content types (e.g. to drive compliance policies)

Extract content
Extract content

Extract table content
Summary of AI model training Machine teaching based on flexible rules for classification and extraction (e.g. proximity rules such as "X should be within 50 characters of Y")  Machine teaching based on well-defined locations with the document
Underlying technology Native to SharePoint Syntex Power Apps AI Builder - form processing
Technical implementation Model is applied to the SharePoint library through model settings A Power Automate Flow is created and associated with the originating library - but currently cannot be applied to different libraries
How applied across your tenant Create model once, apply to multiple SharePoint libraries (one by one) Created model is tied to originating document library (today)
Licensing Syntex license only:

£3.40 or $5 per user per month

(see "Who needs a Syntex license" later)
Syntex license + AI Builder credits:

Each user needs a Syntex license, and in terms of AI Builder credits, orgs with 300+ Syntex licenses receive a bundled allowance of 1m credits (one off). 

See AI Builder calculator for examples of how many credits are consumed by different operations - but in short, 1m in credits is extremely generous even for large organizations. As a guideline, if you process 5000 documents per month that would be just 4 credits per month.

To purchase, 1 unit of AI Builder credit costs £377 or $500
Supported file types All Office file types, .eml, JPG, PNG, PDF, RTF, TIFF, txt JPG, PNG or PDF
Key limitations Office files are truncated at 64k characters

OCR-scanned files (PDF, image or TIFF) are limited to 20 pages
Tables must be simple - no nested tables or merged cells
Signatures, checkboxes and radio buttons cannot be extracted

Max 500 pages


Let's dig into more detail on a couple of these points.


Differing approaches to machine teaching 

I mention in the table above the differences in how the AI models are trained. Perhaps the images below explain it best.

In structured document understanding, I'm very precisely teaching Syntex where to find a previously-specified element of the document I want to extract - in this case the invoice reference:


In document understanding, I can do the same thing - however, I can also add some flexibility by defining "explanations" (essentially rules) which provide some extra context about variations in the document format that the AI might need to deal with:

I can also teach the machine how specific parts of the document relate to each other with a proximity rule. In the explanation below, I'm saying "first find the 'Fees and Payment' phrase, then find 'Total' which is more than 20 tokens away but less than 100. Once there, find the thing that looks like a GBP currency value which is VERY close, in fact less than 10 tokens away:

So, these differences can rule in or out one model depending on what your documents look like.

Considerations when applying across your tenant

The current limitation of an unstructured document understanding model being tied to the SharePoint library where it was created is an important factor. This means that, as of today, there's no real pathway to using one of these models across your Microsoft 365 environment - so if your invoices/order forms/receipts get stored in many different SharePoint sites or document libraries you have a lot of work on your hands to replicate the solution.

This is somewhat surprising since the implementation is a Power Automate Flow. Conceivably, you could copy and paste Flow actions to speed things up - however, I note that simply trying to repoint the Flow to another SharePoint document library (by updating references) currently fails, perhaps indicating that there are some internal references which become out of sync. Indeed, the Microsoft documentation states:

Unstructured document understanding models can currently only be applied to the SharePoint document library from which you created them. This allows licensed users with access to the site to create a structured document understanding model. Note that an admin needs to enable structured document understanding on a SharePoint document library for it to be available to licensed users.

Hopefully Syntex unstructured document understanding models become much more reusable and portable in the future. 

Other benefits with SharePoint Syntex licensing

Notably, Microsoft provide some other capabilities as part of the Syntex license. These are badged as "premium" items and include:

  • Term store analytics
    • Insights on how tags are being applied to your content - term store operations, open and closed term sets, terms without synonyms and more 
    • See Term store reports | Microsoft Docs
  • Content type push to hub
    • More control over where content types get applied to your environment. Being able to pushing from the central term store to a hub can become the first part in a chain, where the second part is the existing "push from hub to associated sites" capability. In the end, you get your content types to where they need to be without PowerShell or other roll your own approaches
    • See Push content type to hub
  • Import using SKOS format

Who needs a Syntex license?

At £3.40/$5 per user per month for the Syntex add-on, understanding exactly who in the organization requires a Syntex license becomes critical. The SharePoint Syntex FAQ states the following, though the highlighting is mine:

Anyone using, consuming, or otherwise benefiting from SharePoint Syntex capabilities requires a license. This includes the following scenarios:

  • Access a Content Center
  • Create a document understanding model in a Content Center
  • Upload content to a library where a document understanding model is associated (whether in a Content Center or elsewhere)
  • Manually execute a document understanding model
  • View a library where a document understanding model is associated
  • Create an unstructured document understanding model via the entry point in a SharePoint library
  • Upload content to a library where an unstructured document understanding model is associated

In summary the licensing requirements are certainly pervasive - even viewing a SharePoint library where a Syntex model is used requires a license. 

Conclusions

An organization's ability to automate processes around documents, improve findability and extract important corporate knowledge from files will be important factors in agility and effectiveness over the next few years. You can find the AI that supports this in a few different places in the Microsoft stack (and the wider cloud market), but Syntex is the easy-to-consume technology that brings this directly to where your documents are in Office 365 - SharePoint and Teams. With a little experimentation and persistence, a non-technical business user can build powerful automations and effective search tools. 

Syntex licensing means that it's likely to be used in specific use cases - perhaps for your organization it could be something around CVs/resumes, RFPs, project documents, invoices, order forms or partner details - but you may not feel it's appropriate to license every user in your organisation, at least not until the value provided is clear.  

Making the right decisions between the two Syntex approaches of structured and unstructured document understanding is vital and this can be a confusing area. Some of the major differences include what the AI models are capable of, how easy they are to use in different places, supported file types and licensing. Hopefully this article is useful in helping you navigate this.