The idea of combining the power of ChatGPT and LLMs with organisational data has caught the attention of many. It seems to form the basis for many of the conversations I'm having with CIOs and tech leaders at the moment, and with good reason I think. After all, if you could "train" ChatGPT/generative AI everything about your company, your products and services, clients, employees and expertise, past projects and other valuable information, the potential would be huge. If you could further add a sprinkling of the most relevant content on the internet such as the latest industry regulations, analyst reports, or information from accredited suppliers, the potential could be increased further. "Instead of searching and creating, can't I just ask generative AI to give me what I need?" is a common theme of questioning. In my view we're only starting to understand the possibilities and accuracy rates, but in our client projects so far where we've integrated organisational data with ChatGPT, the results are pretty incredible. As one example, being able to ask natural language questions about past projects and get high quality, easy to understand answers, seems to bring out organisational knowledge in a powerful way that helps with decision-making and winning business.
There are many approaches to integrating custom data with AI. For most Microsoft-centric organisations, when we talk about ChatGPT it's actually Azure OpenAI which is the starting point for generative AI. This is because it allows safe and controlled use of OpenAI models such as GPT-4, but delivered with all the benefits of trusted Azure such as improved privacy controls, data sovereignty, governance policies, and integration into existing cloud billing. The approach described here revolves around Azure OpenAI and you'll need to have an instance of the service created.
With this context, this article covers:
- Core concepts when integrating data with ChatGPT/Azure OpenAI
- Overview of Azure OpenAI on your data, with a focus on integrating Microsoft 365/SharePoint data in particular
- The setup process for Azure OpenAI on your data
- What the solution looks like and findings from testing
- My thoughts on where the solution fits in combining AI with your data
RAG and other concepts in integrating data with ChatGPT and gen AI
Stitching together custom data with LLMs requires work. There are several overarching approaches, including training your own model (expensive and complex), fine-tuning an existing model (limited to small pieces of data), to techniques like Retrieval Augmented Generation (or RAG) which essentially combine searching across your dataset - that's the retrieval part - with the answer and content generation we commonly associate with LLMs. RAG is essentially a multi-step process, consisting of at least these steps:
- Take user prompt and search across a dataset (i.e. your organisational data) for relevant information
- Construct a long, detailed prompt for the LLM which includes the fetched data - this is known as grounding
- Generate a natural language response based on the retrieved information
The response will therefore feel like ChatGPT has not only been trained on internet data, but your custom company data too. The user does not know or care that a few things have happened under the surface. RAG is essentially the approach used by Microsoft 365 Copilot, where the data being returned in the initial step is from the Microsoft Graph - documents, relationships, meetings,
activities, and other data in Microsoft 365.
In RAG, information is often converted to vectors or embeddings to better support natural language processing.
Overview - Azure OpenAI on your data
To help with the data integration question, Microsoft provide the Azure OpenAI on your data capability (shortened to "AOI on your data" in this article). This is effectively a PaaS accelerator where much of the back-end complexity of integrating LLMs with your data is taken care of. It takes care of creating a back-end data store, allowing your custom data to be ingested, creating embeddings/vectors from your data (at least in some circumstances - more on that later), and allows you to quickly deploy a sample app to provide a basic user interface with some of the useful features you might want (e.g. chat history and citations). It does use resources in your chosen Azure subscription though - you'll either create these at the time of initial config or point to resources you've already provisioned.
Azure Cognitive Search is a key ingredient
In Azure OpenAI on your data, the key technology which allows your documents and data to be combined with AI is Azure Cognitive Search. Cognitive Search provides the information store from which the initial information is retrieved, before feeding this into the prompt to ChatGPT/the LLM. Conceptually you can use any queryable data platform in Retrieval Augmented Generation, but it helps a lot if the platform can store vector data. Azure Cognitive Search has been extended with this capability, but know that many vector database options have sprung up in the AI era - from dedicated vector DBs such as Pinecone, Qdrant and Weaviate, to additions to existing technologies like Azure Cosmos DB (MongoDB flavour), Databricks, and Redis. Microsoft promote Azure Cognitive Search for generative AI applications, and it does have some fairly unique capabilities. Azure OpenAI on your data supports the following data sources:
- Azure BLOBs
- Files you upload
- An existing Azure Cognitive Search instance you have (which could hold information you've indexed from lots of sources)
Needless to say, the last option is the most powerful and flexible, so it's the one we'll look at here. One reason is that Azure Cognitive Search has an array of connectors which will allow you to bring in content quite easily from lots of platforms. These essentially break down as:
- Native Microsoft connectors:
- SharePoint Online, Azure SQL, Azure Cosmos DB, Azure MySQL, Azure BLOBs, Files, Tables, Data Lake Gen 2 etc.
- Third party connectors - there are many, including:
- Adobe AEM, Amazon S3, Atlassian, Bentley Connectwise, Box.com, Elasticsearch and lots more - see the ACS connectors gallery
- Your custom connector:
- Essentially you can index anything by generating some JSON conforming to a particular structure
Using the 'existing Cognitive Search' option in Azure OpenAI on your data
As you might expect, you need an Azure Cognitive Search instance already and to have some data indexed, so if you're experimenting with this you'll need to get one created. If you're interested in "AI on your data" I recommend spending the time on this - it will help you understand how to combine ChatGPT with all sorts of data and platforms.
Unfortunately the free tier of ACS is not supported for AOI on your data, so you'll need an instance created on at least the 'Basic' tier (£61.05 per month in UK pricing at this time). A good resource for getting started is Create an Azure Cognitive Search service in the portal - the process described there will get you the base service provisioned in Azure. The next step is to connect to some content.
Indexing content in Microsoft 365/SharePoint Online with the SharePoint indexer
One popular scenario will be to combine ChatGPT/Azure OpenAI powers with the knowledge contained within documents in Microsoft 365. Sure, it's exactly what Microsoft 365 Copilot will do when it arrives, but for me there are still many reasons to explore going this way - perhaps in addition to adoption of Copilot. For one thing, licensing of all users in an organisation may be a difficult investment case at $30 per user per month - it's unlikely to be something rolled out to the entire organisation for most. In contrast, a tool you stitch together yourself could be - and it could be quite cost effective since there are building blocks like Azure Cognitive Search to support the journey. An AI strategy which combines Microsoft 365 Copilot usage (for those who derive the most value), with a supplementary AI tool which understands organisational data but has no per-user costs, could be a powerful approach to leveraging AI over the next few years. Regarding the latter, Azure Cognitive Search can bring together data from many sources quite easily - meaning it's a good foundation for AI that understands LOTS of how your organisation works. A key benefit is that it can go beyond just data in Microsoft 365.
To get set up with Azure Cognitive Search indexing some of your M365/SharePoint content, I recommend following these instructions:
SharePoint indexer (preview) - Azure Cognitive Search | Microsoft Learn
Note that there are some technical steps in there since the config is done via Postman and the ACS REST API, but the process doesn't take too long. Once you've done this, it's now time for the fun part - configuring Azure OpenAI on your data and pointing to your Cognitive Search instance.
Configuring Azure OpenAI on your data with ACS
The config steps for this part are done in the Azure AI Studio for your Azure OpenAI instance. As a reminder, you can get to this from the main Azure portal - your OpenAI instance will provide a link.
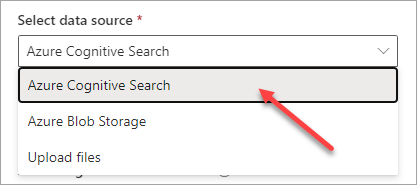
Once there, head into the chat playground and find the "Add your data" tab. Click the "Add a data source" button as shown below:
In the dropdown which appears, select the Azure Cognitive Search option:
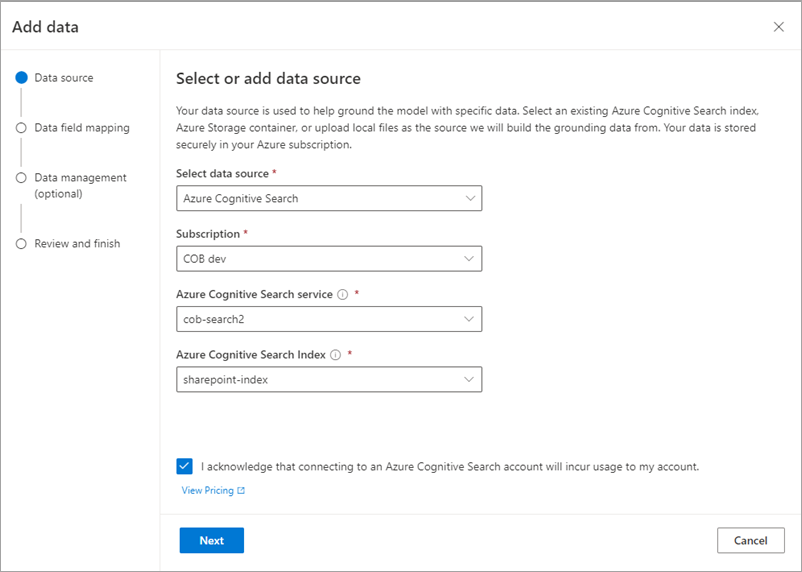
In the next dialog you're going to point to your Azure Cogntive Search instance by selecting the parent Azure subscription then choosing the ACS service. Note that you also select a specific index within Cognitive Search here - which is why you need all the Cognitive Search config to be in place already using a process like that described above in the "Indexing content in Microsoft 365/SharePoint Online with the SharePoint indexer" section:
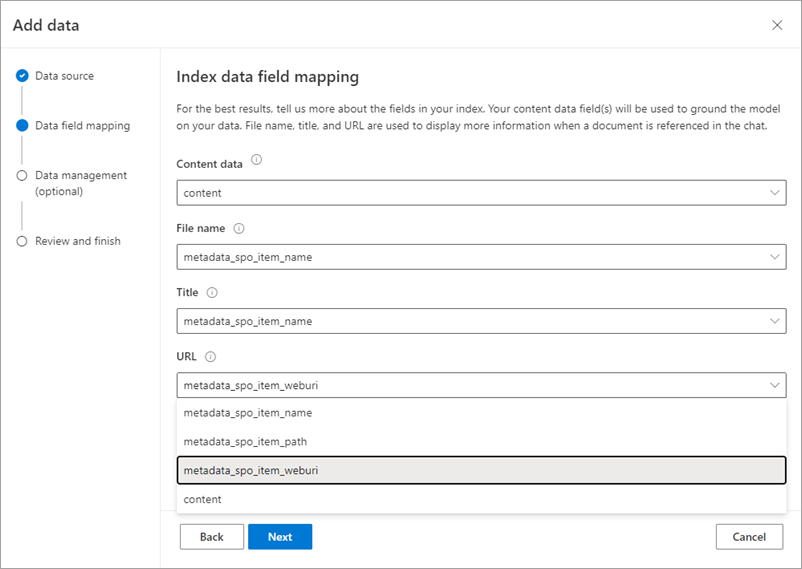
The next step involves telling ACS how to establish the various bits of data to display in search results. Since the '10 blue links' we associate with search results are always comprised of a title, a URL, a filename and a snippet of content, we need to tell ACS what they should be for the content being indexed. If you were indexing SQL data this might need more thought, but since SharePoint content is a set of files which naturally have these elements the mappings are quite logical. Just use the dropdowns to map each field to the relevant item specified when you created the indexer:
The final option relates to semantic search in Azure Cognitive Search, which is the ability of ACS to semantically understand relationships between concepts in your data. I'd recommend treating this as an advanced capability that you might not start off with - it's chargeable for one thing, and we've been finding good quality results without it, most likely because vector search is already doing some of this. So, I suggesting skipping past this one for now:
The final step is to confirm your settings:
Once confirmed, you'll be back in the main area of the chat playground with your configuration displayed. Note the "limit responses to your data content" checkbox - this constrains the LLM to only your added data and ignores the core internet data it knows already. Whether you check this or not will depend on the solution you're building (i.e. whether you want both sources involved), but I suggest that you definitely want this during testing at least:
Config is now complete and we can think about the front-end interface and starting to test.
Deploying the sample app front-end
Azure OpenAI on your data provides a deployable web application which can serve as the front-end. In reality, this isn't something you could deploy to an organisation without further work but it can be useful for testing and/or to accelerate the creation of a real front-end app. To provision it into your Azure subscription, start by finding the "Deploy to" button in the top-right hand corner of the Azure OpenAI Studio:
Choose your preferred option, but in my case I'm choosing the web app:
Specify the details for your web app - here's what mine looked like:
Once the web app has finished deploying, the AOI Studio will display this in the top-right corner:
Alternatively you can navigate straight in with the URL you specified. When you get there you'll see a basic web app which is talking to your data:
Looks good! But is it the promised land of ChatGPT and generative AI that truly understands your data? I'll start to answer that here, but there's a lot to consider so I expand on things in the next article - for those working in this space it's worth discussing findings and recommendations in more detail.
Testing generative AI on your data
In short the results from my testing were.....mixed. I put this down to the Azure OpenAI accelerator taking care of some things for you, but for a production-grade solution my view is that you need more control and there's more work to do. Take this how you wish, but for now we are not using the "AOI on your data" accelerator in our client projects at Advania/Content+Cloud which combine generative AI and custom data. We're using similar principles and the very same technologies, but more 'grown-up' approaches based on the Microsoft documentation and other info. More on
Background - my scenario and data for testing
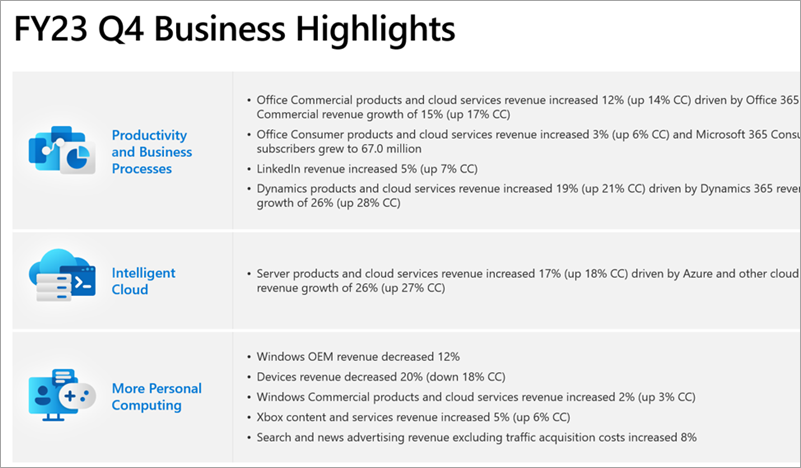
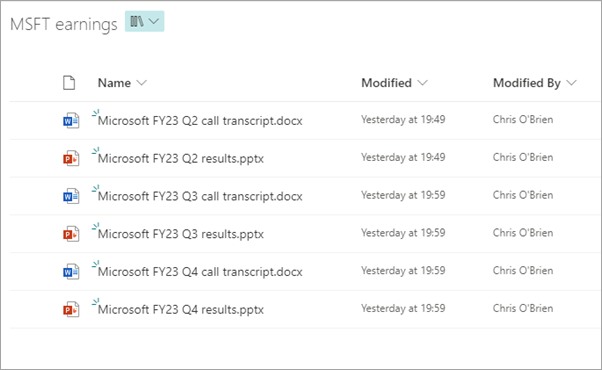
As a set of documents to interrogate, I'm using some of Microsoft's earnings reports from recent quarters. I spend quite a bit of time analysing these each quarter to understand Microsoft performance and strategy - they are full of dense information and it would be highly beneficial to be able to ask the AI simple questions and get simple answers, rather than lengthy digestion and interpreting of the contents which I do today. The documents take the format of both PowerPoint documents and Word transcripts from the quarterly earnings calls. I only have a few documents but as I say, they are full of complex information - here they are in the SharePoint document library which ACS is indexing:
The Word call transcripts look like this:
The PowerPoint files look like this:
Results overview
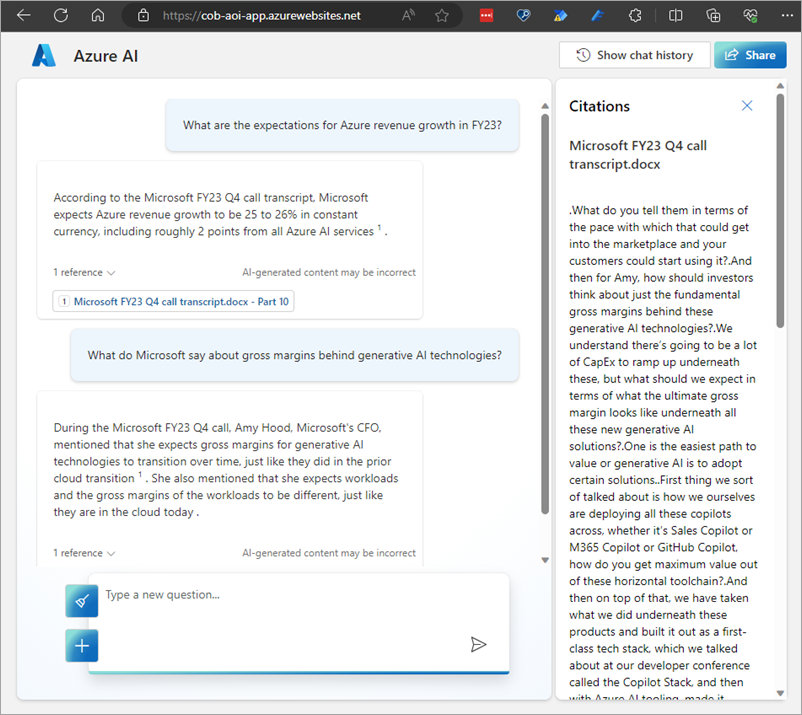
So let's ask some questions of the data. Initial results seem quite promising, like the answers in this converation thread:
Looks good! Any solid "generative AI on your data" solution should help you understand how it's finding the answers, and expanding the citation helps me see the source content:
However, the solution runs into challenges with some requests. Here's an example which I feel should have been answered:
That's a bit surprising because the answer isn't hard to find in the document set. In a different case, I see a bit of hallucination happening. The data is actually being misunderstood, and an answer is given but it's incorrect. The question I'm asking should again be quite easy to obtain from the documents - total revenue for a specific quarter:
The reason I know it's incorrect is because the answer is quite easy to find in both the PowerPoint and Word documents. Here it is in the deck for example:
Expanding the citation starts to explain what's happening here:
The AI has found something referring to revenue for the quarter, but in fact these numbers relate purely to Intelligent Cloud, one of Microsoft's segments, rather than total revenue. The fact that this part of the discussion in the call transcript relates purely to this has has been misunderstood. This is obviously somewhat concerning. As we combine AI with our data, the need for accuracy and precision tends to increase compared to consumer uses of ChatGPT for example. So why is this happening? Let's consider this and expand out into overall conclusions.
My high-level conclusions on Azure OpenAI on your data
My speculation on why AOI on your data doesn't always give great results in these cases comes down to what it does and does not do. Specifically, I put the AI misses above down to the fact that the data is not chunked properly. Sidebar - in the context of AI on your data, "chunking" is a key concept and refers to the practice of splitting long documents which go beyond the limitations of prompt size, e.g 4000 or 32000 tokens for GPT-4 (a token is around 4 characters of text). Clearly, a long document in it's entirety will not fit into the maximum prompt size allowed by LLMs today, so the typical approach involves splitting documents into smaller chunks. Indeed, Microsoft's documentation for AI on your data is explicit in calling out that you might need to do this - the "Ingesting your data into Azure Cognitive Search" section of the AOI on your data documentation (also linked below) discusses this and links to a commonly used 'data preparation' script - however it's something critical you'll need to take care of if you're building any kind of production solution. In some ways, this illustrates the issue with Microsoft's AOI on your data solution today - while it helps in provisioning a starter point for some elements, it doesn't necessarily do the hard bits which you'll need.
By it's nature, Azure OpenAI is an accelerator which tries to simplify the complex aspects of combining AI with your data, but realistically it cannot take care of everything. Colleagues and I are currently viewing it as a low-code route to AI on your data, and like many low-code solutions there are some trade-offs and you hope you don't run into brick walls. In Power Apps for example, it's possible to break past constraints by calling out to an Azure Function to run custom code or bringing in PCF components to go past out-of-the-box UX controls. In the same way, it's necessary to understand where the boundaries lie with AOI on your data. Let me try to be more specific.
Where Azure OpenAI on your data helps and where it doesn't
AOI on your data is helpful in the following ways:
- Provisioning a sample web app front-end to Azure App Service - this uses a GitHub sample which isn't a bad starting point, and the solution provisions an App Service and App Service Plan for you. The sample code surfaces capabilities such as SSO auth, chat history and citations, various config options in app settings, and while the UX is very basic it certainly could be extended (the exact sample used is linked below)
- Provisioning a back-end data store - a Cosmos DB instance used to store chat history, which is configured with 'provisioned throughput' capacity mode (i.e. consumption-based pricing), and the Azure Cognitive Search instance if you're not pointing to an existing one
- Hooking up the front-end to the back-end - integrating the sample app to various infrastructure pieces via app config settings - your Cosmos DB, Azure Cognitive Search instance, and your Azure OpenAI instance etc.
- Helping you connect Azure OpenAI in a basic way to simple custom data sources - as described above, this provides the basics to connect to Azure Blob Storage, the file upload option, and an existing Azure Cognitive Search instance (the approach used in this article)
However it's less helpful with other things you need:
- Chunking of your data/content - when you bring an existing Azure Cognitive Search instance, which you'll do for anything other than Azure Blobs or the upload option (e.g. when you want to connect to a wider set of documents in Microsoft 365/SharePoint), the solution will use the data in it's non-chunked form - resulting in potential accuracy challenges
- Generating vectors/embeddings from your data - this is required to provide similarity search, the capability that allows ChatGPT and generative AI to be so powerful in truly 'understanding' the training data
- Support for a wide variety of data - the solution supports Word, PowerPoint, PDF and some simple file types (.html, .text, .md) but for anything else you're on your own. Additionally, the processing of these formats is somewhat 'black box' and if it doesn't do the right things for you (e.g. deal with images, graphs, or tables in your PDFs in the right way), it seems there's no control to improve things
- Aligning with enterprise-grade Azure architecture practices - support here is patchy, and I could imagine some organisations may feel the solution doesn't quite align with their Azure standards and governance. For example, if your Azure OpenAI instance is protected by a vNet and private endpoint, Azure OpenAI on your data can connect to this if you complete an application form but not otherwise. Storage accounts with private endpoints are currently not supported
Providing a production-grade front-end which you can roll out to the business - in the end, the solution is deploying a sample app, and sample apps aren't meant for production - they are meant as a starting point for development. We've found there's fairly significant coding work to do on this front, and for our client projects (and internal deployment) we choose to use a different GitHub sample as our starting point to this one (there are several around and we've looked at all the major ones)
In the end, if your goal is to get ChatGPT (by which we really mean Azure OpenAI) talking to your data in Microsoft 365 or Azure, then you'll need to understand some of the deeper mechanics and building blocks involved in creating these solutions. My view is that while AOI on your data takes core of some useful pieces on the journey, those pieces aren't necessarily where the most complexity is. Of course, the capabilities of Azure OpenAI on your data will expand from where they are at the time of writing - there's absolutely no doubt about that. However, my recommendation is to consider the accelerator as the starting point for a technical team to use in a project - either simply as a reference architecture off to the side, or as the basis of a solution they will expand quite significantly. It's a great entry point to the space, but perhaps not the entire solution to providing a solution to the business which combines generative AI and organisational data.
Beyond sample apps - delving deeper into building "AI on your data" solutions
In the next article, I'll go into more detail on some of the concepts you're likely to need to deal with in building a production "AI on your data" solution, and also some of the Microsoft-centric building blocks which are useful like Semantic Kernel. By the way, I certainly wouldn't want to claim I personally have all the answers - some of the wider thinking described above comes from my talented Advania/Content+Cloud colleagues, and even as a collective we're finding that this is definitely an emerging space where things are moving quickly and there's a lot to learn. Consider this info more as an attempt to share key findings and conclusions perhaps - but if Azure OpenAI on your data on it's own doesn't answer all the questions, in the next article I'll share more thoughts on what might work.
It truly is an exciting time, and the possibilities of AI with organisational data are huge from our perspective.
References