Showing posts with label Automation. Show all posts

Sunday, 27 November 2022

Microsoft Syntex - December 2022 update and compiled articles

Microsoft Syntex has been one of Microsoft's biggest announcements in 2022 - which can be somewhat confusing because it existed previously as SharePoint Syntex since 2020 - but Syntex is expanding massively from "AI that understands your documents so you can automate processes" to an entire suite of advanced capabilities related not just to your documents, but also your images and videos. Some of the bigger recent or forthcoming features include document eSignatures, annotations, image recognition, automated document summaries and translations, auto video transcription and much more - many of which were announced at Microsoft's Ignite conference in October 2022. I'm hearing Microsoft folks say that "Syntex could be as big or bigger than the Power Platform in time", which is an interesting thought given the impact that has had.

Over the last 2 years I've been writing a lot about Syntex on this blog and thought it would be good time to do two things:
  • Provide a 'Syntex on a page' round-up of the current and future capabilities    
  • Provide links to my Syntex articles from one place
  • Provide links to a couple of YouTube videos demonstrating Syntex in action from conference talks I've given
This article provides these.

Syntex on a page - December 2022


If you're confused about what's in Syntex and what's coming, I like to put things into these buckets:
  • Content understanding and processing - using AI to understand your documents and automate something 
    • Example - find all risk assessments missing a start date and contact the supplier organisation
    • Example - read an insurance contract and save the policy details to a database
  • Content assembly - automated creation of new documents
    • Example - generate a new contract for every new starter
  • Content management and governance - premium document management capabilities 
    • Example - send a completed contract for eSignature (like DocuSign or Adobe Sign but fully integrated into Microsoft 365) and move location once complete
    • Example - automated detection of pay review documents so specific security or policies can be applied without manual tagging 
The image below (click to enlarge) shows what's in Syntex today and what's in the roadmap:
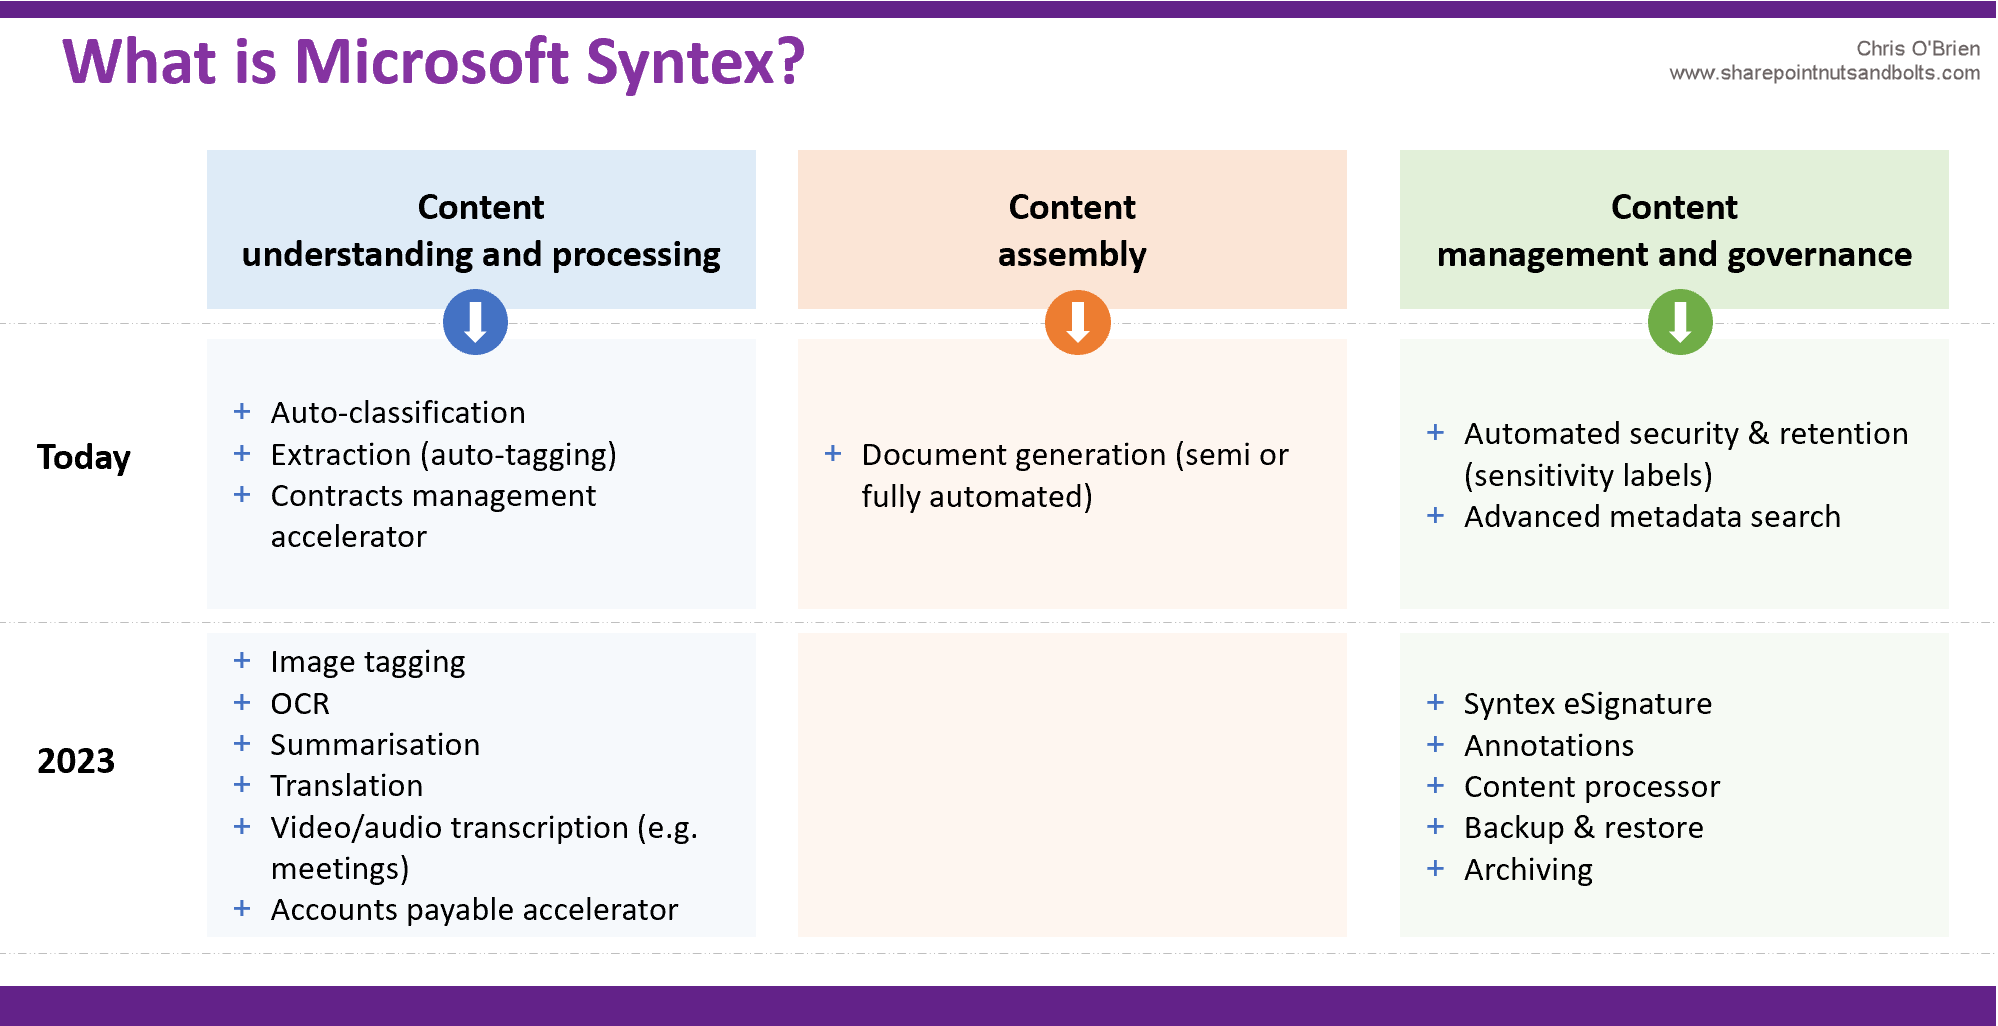


Hopefully that helps position the today/tomorrow capabilities somewhat.
 

Compilation of my articles

I’ve been slowly creating a back catalogue of Syntex articles as I research, learn, and write about the technology. I’ve covered concepts such as training Syntex to read and understand documents, extracting data from forms, automating the creation of new documents, using Syntex in a fully automated process (Straight Through Processing) and various hints and tips articles. Here's a list of Syntex articles which might be useful, starting with the fundamentals and moving into more advanced topics:
Note that there have been some renames along the way, and some of those articles might contain the old names. Here are some examples:
  • SharePoint Syntex -> Microsoft Syntex
  • Document understanding -> Unstructured document processing
  • Forms Processing -> Structured document processing
Hopefully the links above are useful on your Syntex learning journey.

My Syntex videos on YouTube

Seeing Syntex in action can bring it to life a lot more than reading about it. This link points to a couple of the demos I've shown at conferences with a talkover for YouTube: 

Reminder - why is Syntex important?

One way or another, automation will always be a theme of many of the I.T. projects undertaken in the next few years. The trend is increasing, with analysts predicting a $30b market by 2024 (IDC) and Gartner saying 60% of organisations are pursuing four or more automation initiatives. There are many technologies in the space, but Microsoft Syntex changes the game because advanced AI and document automation tools are now baked into the core productivity platform used by 91% the world’s top businesses (i.e. Microsoft 365) - inexpensive, readily available and democratised for every business.
 
It's no surprise Microsoft are investing heavily here. Every organisation has thousands of processes needing human input. If you consider Financial Services as just one industry, banks deal with applications for loans, mortgages, credit cards, loyalty schemes and many other products. Insurance companies quote, sell, and renew policies for home, car, travel, pet cover and more – and those are just the obvious products and services. Zooming out, every industry you can think of has an entire ecosystem of processes that can be optimised.
 
As Syntex powers are amplified and more capabilities are added, spending time evaluating what Syntex can unlock is likely to be valuable for many organisations. 

Tuesday, 10 May 2022

Automate creation of new documents with SharePoint Syntex Content Assembly

With the recent Content Assembly feature, SharePoint Syntex can now create templated documents as part of an automated process - all native to Microsoft 365. This is an important part of intelligent automation since so many processes involve a document - in the consumer world your mortgage documents, an insurance quote, a letter confirming a policy change and so on. While financial and ERP systems often take care of invoices, sales orders and purchase orders, the business world revolves around proposals, contracts, safety reports, compliance certificates, checklists, affiliate agreements and many other types of standard document. I know what you're thinking - sure, there have always been ways to automate document creation, but custom code or a 3rd party product have typically been needed. Often these solutions have been very expensive indeed, such as some of those for intelligent proposal generation. 

Another significant thing here is that I don't remember ever seeing a solution 100% baked into the core Microsoft experience in such an intuitive way - that means potentially everyone in the organisation can make use of automated document creation, and without training on specialist tools. This combination of things that make me believe that what Microsoft are doing with Syntex (and the journey they're on with Content Services in general) is extremely significant in the market. 

Scenario used in my example

Before I dive into showing how Syntex Content Assembly works, some details on my scenario - here I want to easily create documents for different open roles here at Content+Cloud. We have no less than 100+ open roles at the moment and these documents are used in internal hiring and to brief external agencies, so simplifying the creation of these documents and reducing the copying and pasting that people currently is a big win. The documents combine variable content (the role details) with standard content (our benefits and working environment etc.) Using Syntex Content Assembly, we can automate the document creation and Syntex ensures the respective details for the role are dropped into placeholders in the template. 

Let's start with the fundamentals.

Syntex Content Assembly ingredients
Understanding how Content Assembly works starts with understanding the two main ingredients needed:
  • A SharePoint list - this will contain an item for each document instance to create, with the values to drop in
  • A 'modern template' - this is an Office document specially created with Syntex support, providing the outer template for the document


Creating a Syntex modern template

Step 1 - creating the list


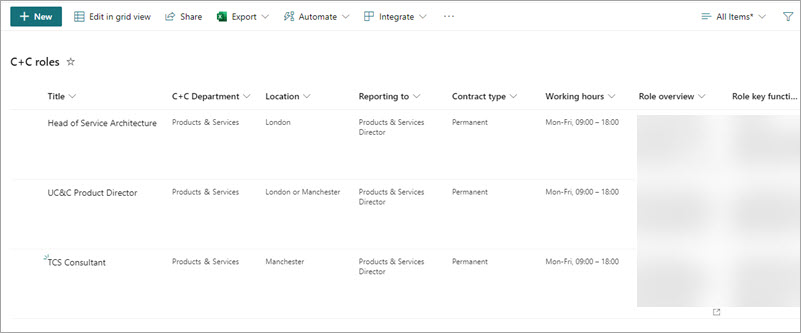
Since you'll automate the creation of documents from items in a SharePoint list, the first thing to do is to define and create that list. In my case it's a list for our open roles and I've added SharePoint columns for the variable pieces of information which will be dropped into the documents:  

It's very important to have this list available and ready (at least it's structure and columns) before going to create the modern template. The reason for this is because the template creation process involves you picking the columns and specifying the location in the document where this information should display. 

Step 2 - creating the template itself


To do this you'll need a user with a Syntex license. A licensed user will see a new option in a SharePoint document library to create a modern template:

Have your Word document ready when you click the item above - but note that it can be a "filled" version of your document rather than a specially prepared template. You'll upload it from your PC rather than select it from an existing SharePoint location:

Once your document has been selected we go to the next phase.
Adding content placeholders to the template
At this point you'll see a panel on the right which will help you drop the placeholders into the document template. Simply highlight some text and then the 'add placeholder' control appears on the right:

The placeholder control asks you to name the placeholder and specify what should be dropped into it when new documents are created from the template. There are two options here:

Text shown Use when
Enter text or select a date The user should enter some new text as each document is created from the template
Select from choices in a column of a list of library The text should be pulled from the list item as each document is created from the template

For the most part you'll probably be using list item values for the vast majority of values dropped into your documents - adding text ad-hoc may be useful sometimes but the real power is in more automated creation from your structured data. Let's look at each in more detail:

Option 1 - entering an ad-hoc value

When creating the template, you'll specify what kind of data can be used for this value, but note this isn't adding any kind of column to the list containing your list items - it just constrains the data that can be entered:

When using the template, a control is presented to the user (matching the data type) to allow the ad-hoc value to be entered:

Option 2 - selecting from a list item

Using this approach, when creating the template you'll browse to the SharePoint list you're using a choose the column which holds values for this 'field' in the document:
First choose the list:
...and then the column:
Once selected you'll see confirmation of the selected column, including if you come back in later to edit:
When using the template, once the user has selected an item in the list for the document instance being created, Syntex will automatically fill in this placeholder from your list item - as it will do for ALL of your placeholders in the document. A placeholder which is bound in this way can't be overtyped, but that makes sense because you are creating the document from a 'record' in your list:

Finalising the template
The template creation process from here is essentially repeating the above steps for each placeholder you need in your template. For each placeholder, either select that the value should be entered ad-hoc or (more likely) pulled from the list item. Once this is done you'll have lots of placeholders in your template, with each one listed on the right-hand side showing where the value will come from:
At this point the template can be published. Hit the publish button and see the confirmation:
So once we have the template in place, what does creating a document look like?

Creating documents using Syntex Content Assembly


At this point all of the one-off, upfront work to create the template is done - so creating new document instances from the template is quick and easy. No more copy and paste between documents! The critical point to note here is that currently document creation does involve a manual step. I think we can be sure that Power Automate actions will be here very soon to provide end-to-end automation, but for now here's how the process works - your Syntex modern template appears on the 'New' menu for your SharePoint document library:
Selecting the menu option takes you into creating a document instance from your template:
You can give the document a name (the default is the template name) using the editable name highlighted with the red arrow. On the right-hand side, all the placeholders are currently empty - the only reason the document in the image below has content is because in this case my template has content in it (as opposed to empty placeholder values). In any case, they will be overwritten in the next step. To create a document using one of my items in the SharePoint list, I simply choose a field (most likely the title field) and I see a picker of my list items:
Once an item is selected, all values are pulled from the list item and dropped into the corresponding placeholder in the document. You'll need to hit the 'Refresh to preview' button:
The document is now created!


As you'd expect, it lands in the document library where you created and applied the modern template:

So what do we take away from this?

 
The significance of Syntex Content Assembly
What we're seeing here is another big step in the democratization of automation solutions. Sure, there's some complexity as you get used to Syntex Content Assembly, but for the first time it's completely native and baked into Microsoft 365 (specifically the SharePoint document library interface) and doesn't require any coding, scripting, or complex configuration.

Every single organisation today has people copy/pasting into documents - statements of work, project plans, legal agreements, sales pitches, supplier/partner/employee contracts, role descriptions, and many more. In the best-case scenario, a lot of time is being wasted. In the worst-case, human error can creep in and in some cases can have a serious impact on work and people. With Syntex Content Assembly, Microsoft is making a serious play in document automation for the masses - and a segment of specialised product vendors are likely be worried.

Today there are quite a few limitations. A couple of clicks are needed to create the document (so arguably not full automation), there's a one-to-one relationship between the template and a document library, and for now it's only Word. Additionally, in my experience Syntex is a bit finicky in terms of what can be in your Word template. These are worth discussing in more detail, so I'll cover these and more in my next post:

Thursday, 8 July 2021

Using RPA to control my ISP settings for kids gaming - Power Automate Desktop for web automation - part 2

In the last post I talked about how I automated my home wi-fi/ISP settings with Power Automate Desktop so that my kids can only use gaming websites like Roblox at permitted times. Since the scheduler in the portal doesn't support what I need, I had been manually visiting the site many times each week to block and unblock sites, which was a huge pain to both me and the kids. Enter Robotic Process Automation - RPA technologies are designed to "automate what cannot be automated", in other words applications without APIs, applications which run on the desktop and other legacy systems. By driving the keyboard and mouse directly, RPA opens the door to wider automation since it simply replicates how a human would interact with the application. Power Automate Desktop is now free with Windows 10 and Windows 11 - Microsoft's move to bring RPA technology to the masses and gain market share as RPA moves from exotic and niche to democratised and commonplace.

In this follow-up post I want to cover a few things:

  • Turning a Power Automate Desktop flow into a cloud flow which can run on a schedule
  • Sending a mobile notification once the flow has run
  • Licensing considerations for Power Automate Desktop
  • Authentication challenges and solutions - working around Captcha requests

In the last post I walked through how I got Power Automate Desktop to open a browser, navigate to my ISP's portal, find the page with the URL blocking, enter the two gaming URLs I want to block into a textbox and then click 'Apply' - with the final step being an announcement to Alexa. This now runs like clockwork every day once the kids have had their prescribed hour of fun. To give you a sense of what that looks like, the portal looks like this:


Where we got to in the last post is that my process was automated, but only in the sense that I have to click a button manually to trigger all the steps to execute. At this point I have a couple of "desktop flows" (one to block the URLs and one to unblock), and they show up in the relevant area in the Power Automate portal:

Of course, what I really want is for this to run in a 100% automated way and on a schedule - with no manual intervention involved. For that I need a cloud flow, so from our points above let's start there. 

Calling a Power Automate Desktop flow from a cloud flow for full automation

Once you have an RPA Flow it can be "wrapped" in a standard cloud flow - a cloud flow being the type of flow that you've been using all along if you've been working with Power Automate previously. Of course, a cloud flow can be triggered in a huge number of ways including when some data is changed in Microsoft 365, SQL or Dataverse or perhaps when something has happened in Salesforce, Workday or another cloud service, or even when an e-mail is received. In my case I just need a simple schedule. 

To get started I go into Flow and create a new scheduled cloud flow:

I then give my flow a name and define the schedule:

Once in the flow I can use the 'Desktop flows' connector to call the flow on my machine - this is the critical thing that links a cloud flow to a desktop flow:


This action allows me to select from a few Microsoft RPA options - note that all are premium actions (more on licensing later):


This action allows me to select from desktop flows I've already created - they are detected because of the connection previously established, which links my Microsoft 365 identity with my physical laptop:


Once I select one of my desktop flows, the action is intelligent enough to recognise any input parameters to that flow. In my case I parameterised the following to avoid them being hard-coded into my desktop flow:
  • RobloxUrl
  • ScratchUrl
  • AlexaAccessCode
The UI adapts to provide a way for me to enter these:


Take note of the "Run Mode" parameter above which is used to specify whether the desktop flow should run in attended or unattended mode - this is important for usage and licensing. We'll come to this later. 

Once things are saved, that's all I need to schedule and fully automate my desktop flow.

However, there's one more thing - the kids hear about the fact that gaming is either open or closed through the automated Alexa announcement I talked about last time. But I'd like to know that everything happened as expected too, so I add a Flow mobile notification:

...and specify the message:

Now wherever I am the notification comes through on my phone each time one of my flows run:

So now everything is fully automated and I have confidence that my automated process is behaving properly. 

Choosing between attended and unattended mode 

When we were creating a cloud flow to "wrap" our desktop flow earlier, we chose "Attended" for the run mode. When working with Power Automate Desktop and RPA in general, attended vs unattended mode is is an important decision to plan for - on the surface, unattended might seem sensible because you can't guarantee that a user will be at the machine when the flow runs, especially for a process that runs a few times through the day. However, an unattended flow can only run under the following circumstances:
  • All users are completely signed out
  • The screen is locked
  • The gateway connection between the cloud flow and the desktop flow has user sign-in information
In fact, a common use case for unattended flows is for a virtual machine to be used - thus giving you more control around guaranteeing these stipulations can be met. Unattended flows can also run concurrently on the same device if different user accounts are used, and this is useful with long-running processes or doing RPA at scale. 

Notably, licensing is significantly different for unattended vs. attended flows - so this is another reason why planning is required here. Let's turn to licensing now.

Licensing for Power Automate Desktop

I mentioned earlier that Power Automate Desktop is free with Windows 10/11, and that's true. What that gets you is the ability to click a button in Power Automate Desktop client on your machine and have your process run - the further automation that comes with a cloud flow requires pay-for Power Automate licensing however. As usual with Power Automate there are two ways of licensing this - per user and per flow. For per user licensing, you need a specific plan named the "Per-user plan with attended RPA", as shown below on the Microsoft pricing page:

Notice the additional "per bot" consideration if you want to run unattended (the second row). If you're doing per-user licensing you add the "unattended RPA add-on" to the per-user price:

So in summary, the options are:

Mode License approach Base cost Unattended add-on cost Total cost per month
Attended Per user $40 $15 per user per month (until 31 September 2021) - $15 (until 31 September 2021)
Attended Per flow $500 per month - $500
Unattended Per user $40 $15 per user per month (until 31 September 2021) $150 per month $165 (until 31 September 2021)
Unattended Per flow $500 per month $150 per month $650

As ever, you should refer to the official Power Automate licensing page for the current pricing and considerations between per user and per flow licensing.

From Microsoft's pricing you might observe:
  • There's a fairly significant premium for unattended processing. That's because you can automate at scale with this option with many processes running concurrently - if you're using RPA to process 10,000 invoices at month end, this incremental cost is likely to be justified of course.
  • The decision between per user and per flow licensing for Power Automate overall is relevant in this area too - most orgs decide this based on automation strategy and requirements they have in view  
  • Whilst there are some incentives at the time of writing (June/July 2021), it seems that the new pricing applied to Power Apps at this time doesn't carry over to Power Automate in case you're wondering
Overall, you can see this is designed for organizational use rather than anything personal or home-based. In that context of course, if a high value process is being automated the value of this to the organization could be many multiples of the cost - so comparing unattended RPA in Power Automate Desktop with non-enterprise solutions doesn't really make sense. And of course, my scenario of using this business technology to automate my wi-fi settings at home doesn't really make sense either - I created my solution on trial licensing, but if I needed to license this for the long-term the costs (even at $15 per month, which is all I'd need) would be a factor. None of this takes away from the power of the technology however - in a business context Power Automate Desktop is extremely powerful.

And when the trial licensing expires on my solution, I'll just click a single button each day and it will still be less work than going to my ISP portal and entering/removing URLs!

A final challenge for RPA - Captcha prompts

One final topic to address is how to use RPA to automate around visual Captcha challenges like these: 

Of course, the whole point of this kind of check is to ensure there's a human making the request rather than an automated bot - but this is to foil a malicious bot of some kind, rather than our wholesome, legitimate and approved automation. The image above shows the Captcha challenge presented when logging into my ISP's portal.

I suspect it may be possible to use a combination of DOM scraping and image recognition (e.g. Azure Cognitive Services Vision API) to get past something like this - however, reliability could be an issue since these images are small and frankly difficult enough for humans. So, my solution is far less exotic unfortunately:

  • Create a dedicated browser profile and pre-authenticate to the ISP site
  • Ensure the RPA process always uses this browser profile:
  • Enjoy the fact that persistent cookies last a long time with my ISP

So perhaps working around the Captcha problem more than solving it, but since I only need to take action every few weeks when the cookies expire that's good enough in this case. Clearly this could be a challenge for some automation scenarios which target public SaaS services in the enterprise, but wouldn't be common with other targets such as legacy non-cloud applications.

Summary

Over these posts we've seen how effective Power Automate Desktop can be in "automating what cannot be automated". We've discussed the basic "Power Automate Desktop only" approach vs. bringing a desktop flow into a cloud flows to facilitate scheduling or integration with other cloud processes - the latter method requires pay-for licensing in the form of a Power Automate per-user or per-flow license, and unattended processing comes with an extra cost but does enable automation at scale. 

As we noted that the technology is pitched at business automation rather than personal automation. The potential is clear, and it's great to see Microsoft have a strong easy-to-use offering in this space.